May 3, 2024
Machine Learning Tool Integrations #3 Label Studio for All your Labelling Needs

September 7, 2023
Share this post
In the following blog we are going to talk about Label Studio and how you can easily utilize Label Studio for Labelling via deploying it on TrueFoundry
Quality of data is much more important than quantity. This is a well-established principle in the machine learning community, and it is becoming increasingly important as the MLOps community moves towards a data-centric approach.
In a recent talk, Andrew Ng cited the example of a steel defect detection problem, where the data-centric approach was able to improve the model's accuracy by 16%, while the model-centric approach did not improve the accuracy at all.
The data-centric approach is more important than the model-centric approach, especially in cases where the data is limited or noisy - Andrew Ng
You can watch this talk by Andrew Ng regarding the Data-centric approach to Machine Learning:
This is because even the best machine learning models are only as good as the data they are trained on. If the data is noisy or incomplete, the model will learn to make mistakes. This is why it is so important to use high-quality data when training machine learning models.
Even in the context of large language models (LLMs), the importance of high-quality data remains paramount. The paper titled "Training Compute-Optimal Large Language Models" by DeepMind (2022) delves into the scaling laws for LLMs, demonstrating that data quality trumps dataset size. The authors illustrate that a model trained on a mere 500 rows of high-quality data can outperform a model trained on a dataset containing a staggering 100 million rows of low-quality data.
You can read the paper using the following link:
In a similar vein, "WizardLM: A Small, Efficient, and High-Performance Language Model" by Google AI (2022) introduces WizardLM, a compact language model trained on a dataset comprising only 500,000 words. Remarkably, WizardLM achieves state-of-the-art results across various natural language processing tasks, despite its significantly smaller size compared to other LLMs.
You can read the paper using the following link:
What is Label Studio?
Label Studio is an open-source, web-based data labeling tool developed by Heartex. It's designed to streamline the process of annotating data for machine learning tasks. Whether you're working on image classification, named entity recognition, sentiment analysis, or any other labeling task, Label Studio provides a flexible and user-friendly environment to label your data efficiently.
Key Features of Label Studio
- Multi-modal labeling: Label Studio supports images, text, audio, and video.
- Customizable labeling interfaces: Tailor labeling interfaces to your task.
- Labeling quality control: Automatic validation and peer review ensure data quality.
- Team collaboration: Multiple users work on the same project with assigned roles and permissions.
- Integration flexibility: Integrate with your data pipeline with APIs and export options.
- Scalability: Scales with your data labelling needs.
- Open source: Free to use and modify.
The Label Studio Data Labeling Workflow
Step 1: Data Import
The labeling process begins with the import of your raw, unlabeled data into Label Studio. This data could be images, text, audio, video, or any other data format depending on your labeling task. For our example, let's consider an image classification task where you want to categorize images of animals.
Step 2: Project Creation
Once your data is imported, you create a new labeling project within Label Studio. In this project, you define the labeling task, select the data source, and configure the labeling interface. You can customize the interface to suit your specific needs, choosing from various annotation types like bounding boxes, polygons, key points, and more.
For our animal image classification example, you'd create a project named "Animal Classification" and configure it to display images for annotation.
Step 3: Annotation
With the project set up, you invite annotators to start labeling the data. Annotators access the Label Studio platform through a web interface, where they are presented with images from your dataset. In our example, annotators would see images of animals and classify them into predefined categories like "dog," "cat," "horse," etc.
As annotators review each image, they use the labeling tools provided by Label Studio to mark their annotations. For image classification, annotators simply select the appropriate category from the predefined list.
Step 4: Quality Control
To maintain labeling accuracy and consistency, Label Studio offers features for quality control. Annotators can review and validate each other's work, ensuring that labels are correct. You can also implement consensus-building workflows to resolve disagreements among annotators.
Step 5: Data Export
Once the data is labeled to your satisfaction, you export the labeled dataset from Label Studio. The platform provides various export options, including JSON, CSV, or formats compatible with popular machine learning libraries. This labeled dataset is now ready for use in training machine learning models.
Step 6: Model Training
Using the high-quality labeled data obtained from Label Studio, you can proceed to train your machine learning model for animal classification. The labeled data serves as the training set, and the model learns to recognize different animal categories based on the annotations provided by the annotators.
Step 7: Model Evaluation and Deployment
After training the model, you evaluate its performance using a separate test dataset. If the model meets your accuracy criteria, you can deploy it for real-world use, such as automatically categorizing animal images.
Deploy LabelStudio on TrueFoundry
You've learned all about LabelStudio, and now we're excited to share that you can effortlessly host LabelStudio on TrueFoundry. Below, you'll find step-by-step instructions on how to deploy LabelStudio on your Machine Learning setup. Let's get started!
💡
Note:
Very soon you will be able to deploy LabelStudio on TrueFoundry with just one click. We will keep you posted.
1. Register and Setup TrueFoundry`
Before you can harness the power of Label Studio within TrueFoundry, you need to register and set up your TrueFoundry account.
TrueFoundry is a ML Deployment PaaS over Kubernetes to speed up developer workflows while allowing them full flexibility in testing and deploying models while ensuring full security and control for the Infra team.
Go ahead and click on the link below and follow along the instructions:
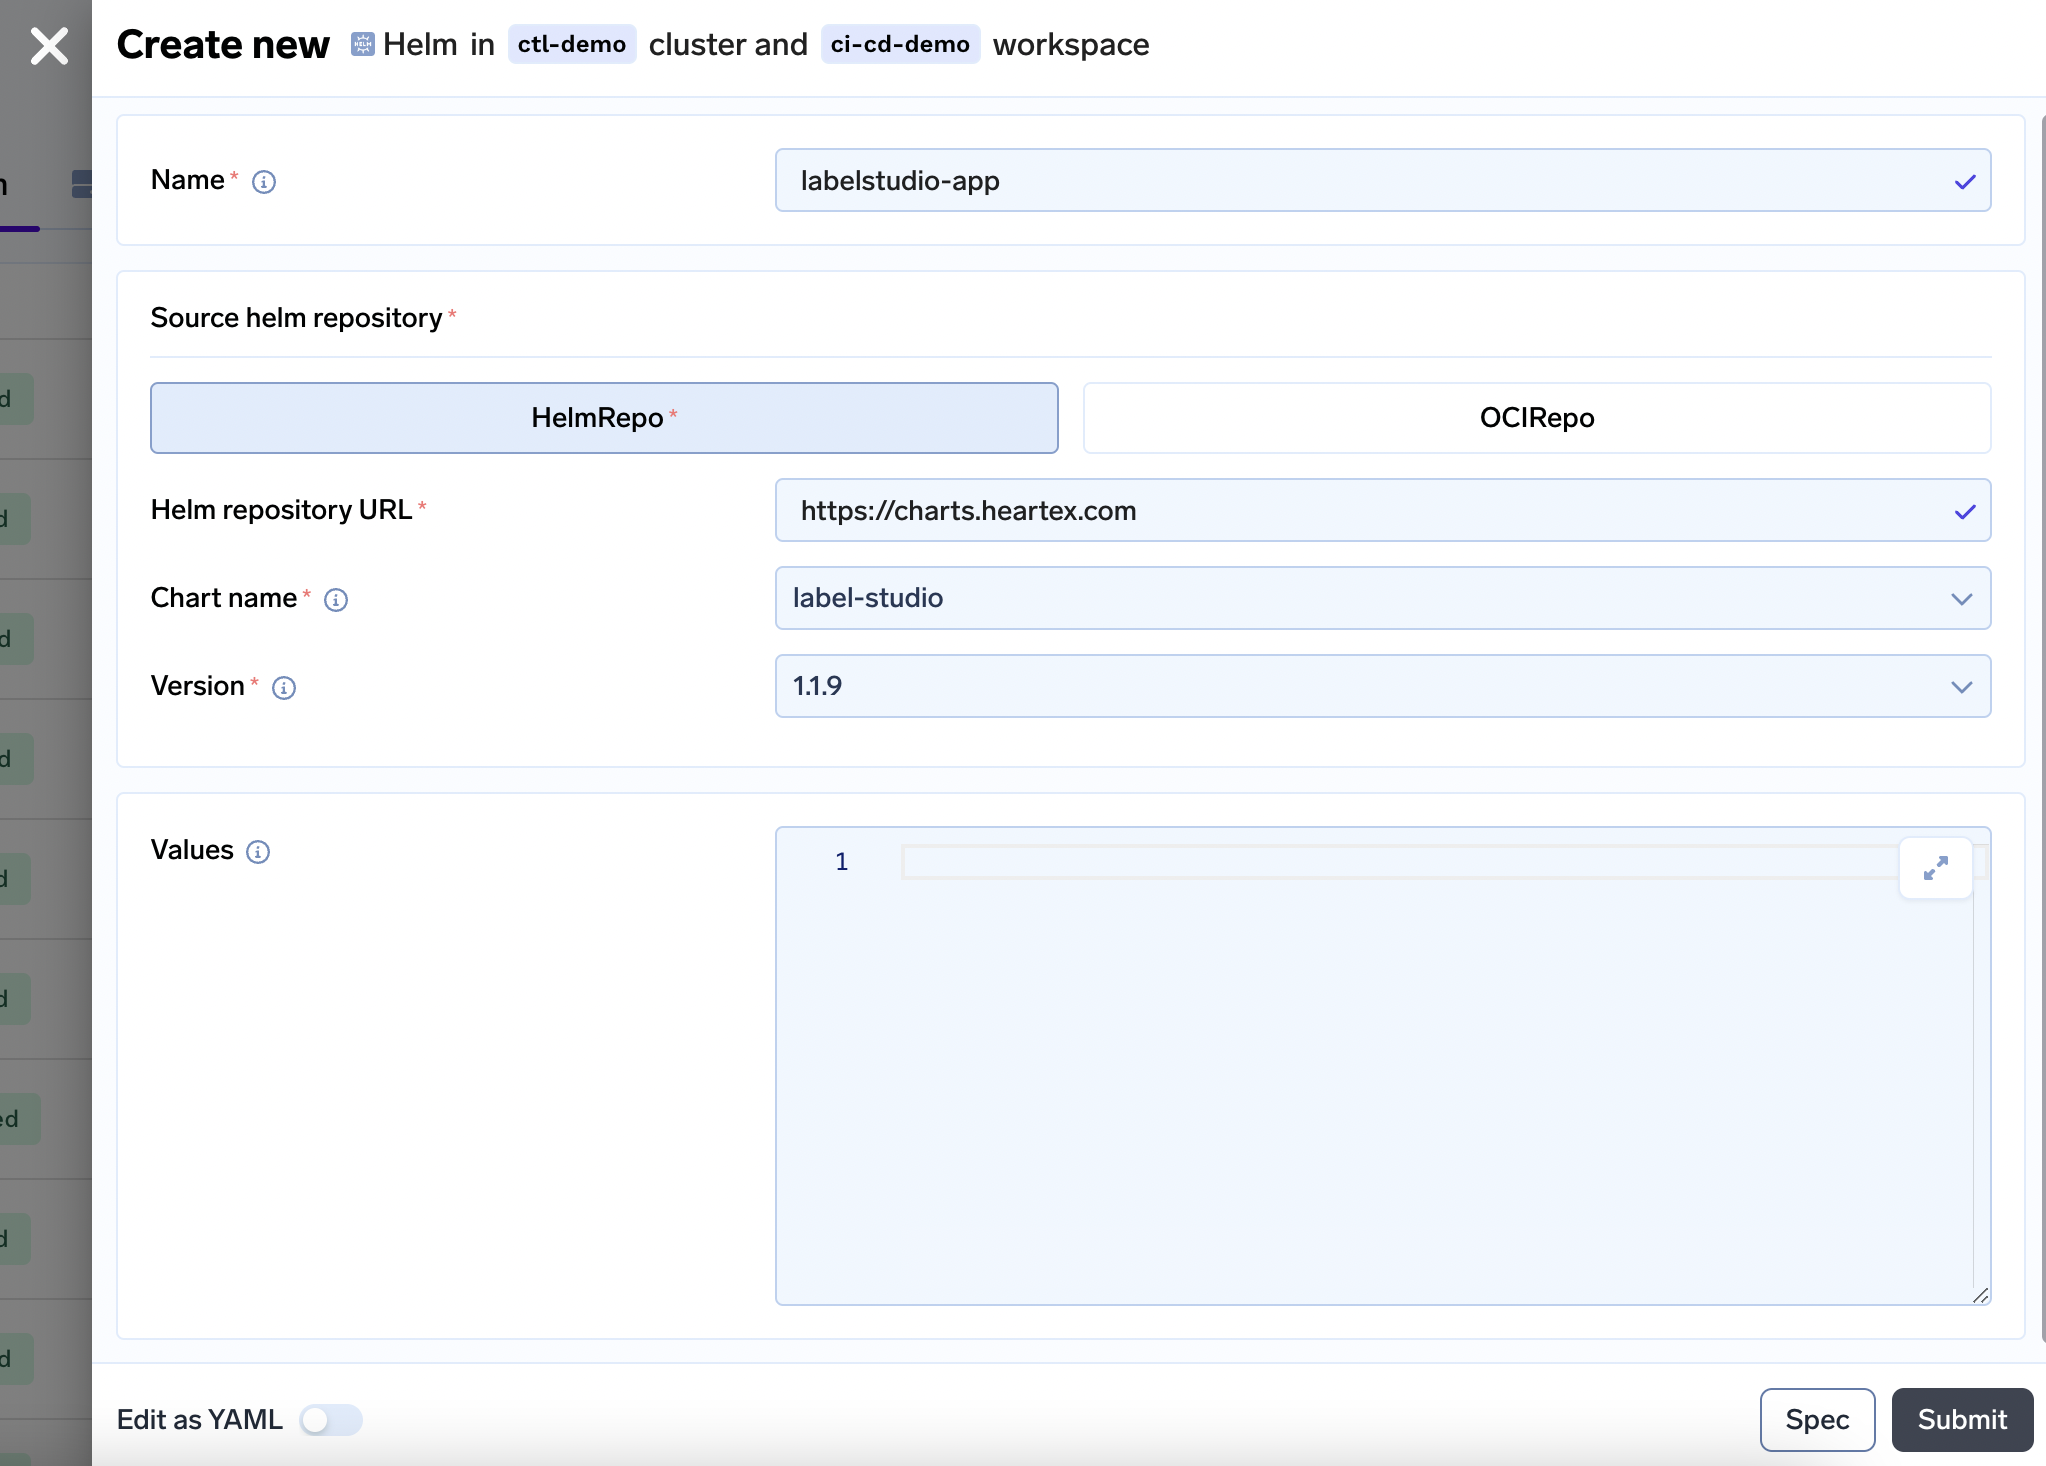
2. Deploy the helm chart for LabelStudio
- New Deployment > Helm > Choose a workspace
- Here fill the following details
- Helm repo: https://charts.heartex.com
- Chart name: label-studio
- Version: 1.1.9
- You can leave the values field empty or configure it as per these. Leaving it empty will bring up the app, a Postgres database and persistent volume to store artefacts.
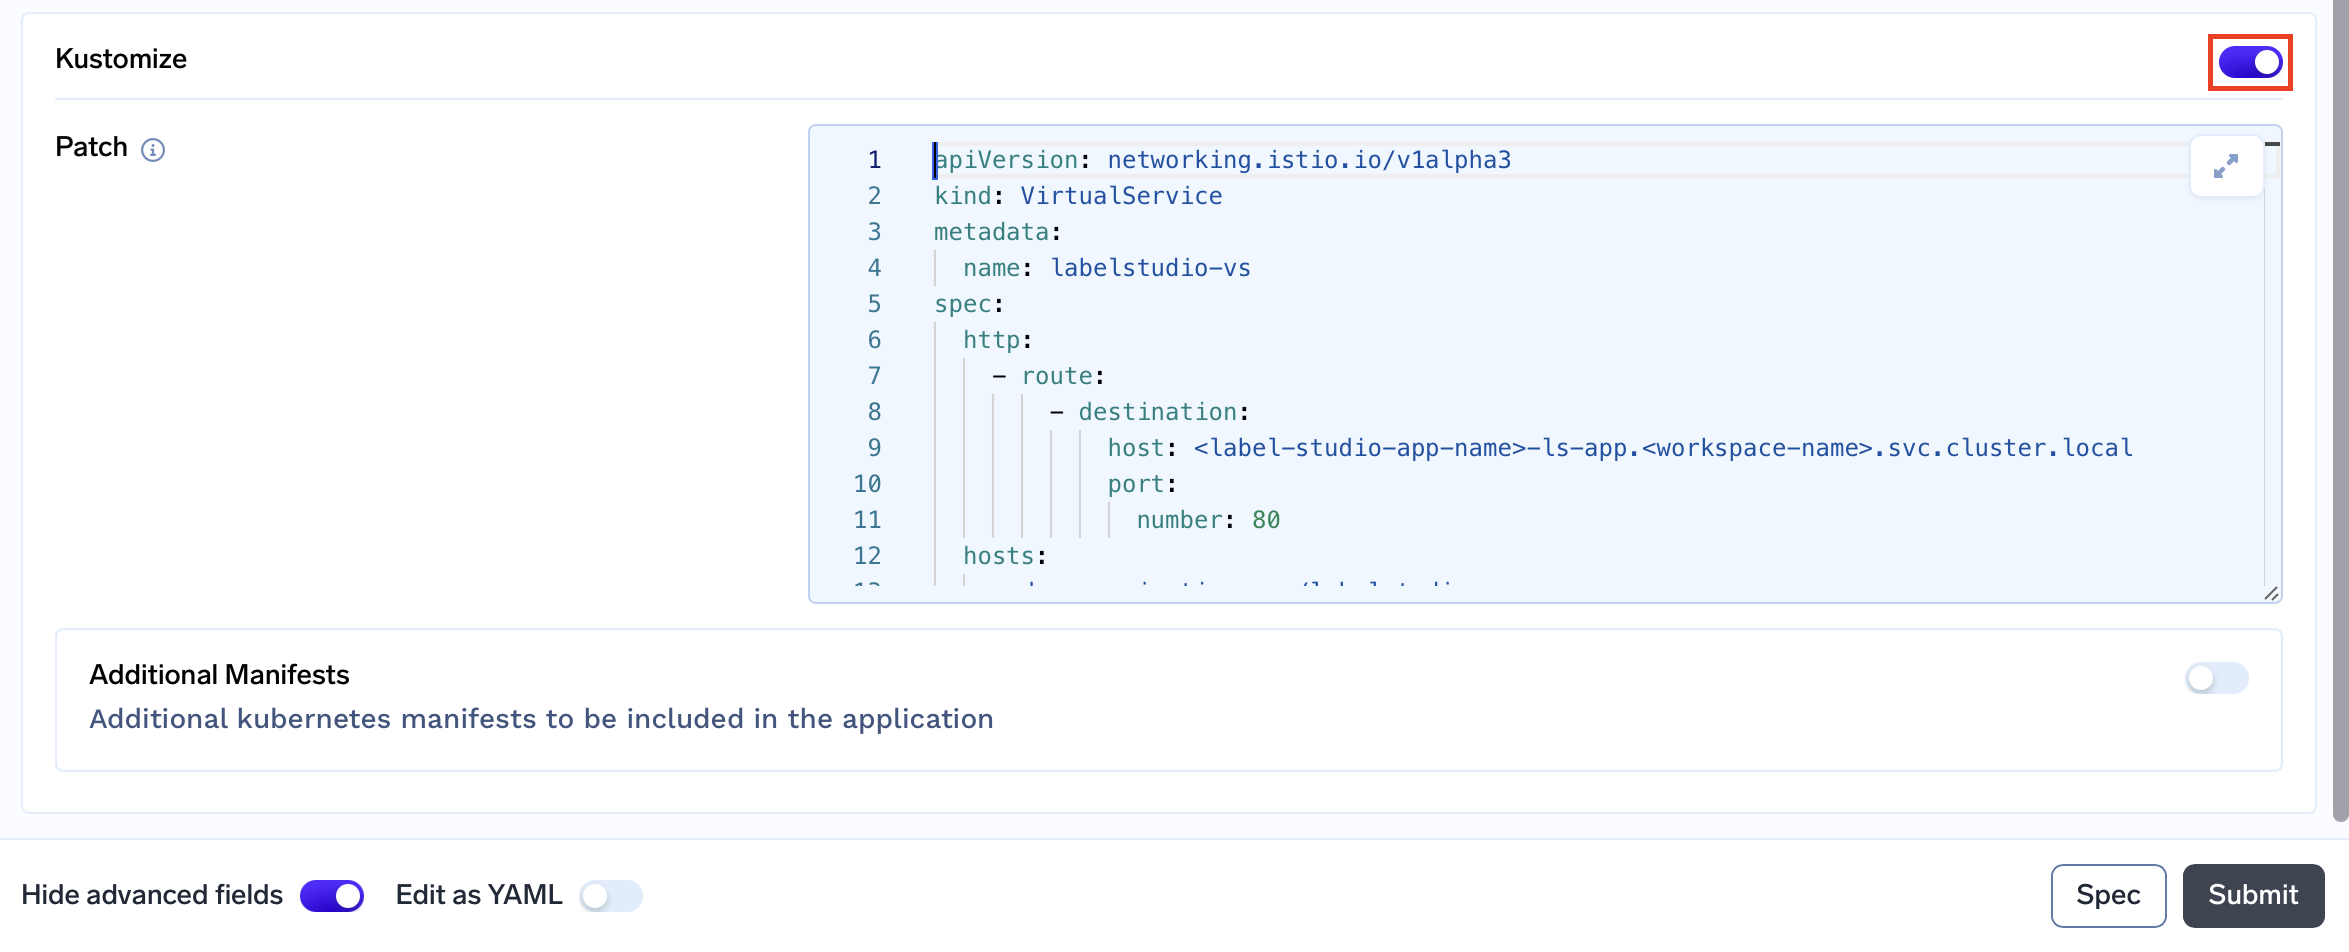
- Setting up Kustomize:
- Click on
Show advanced fieldstoggle at the bottom of the form - Here click on the toggle button in front of Kustomize toggle
- In
Patchtext field add the following manifest, replacingspec.http.route.destinatoin.hostandspec.hostswith the appropriate values
apiVersion: networking.istio.io/v1alpha3
kind: VirtualService
metadata:
  name: labelstudio-vs
spec:
  http:
    - route:
        - destination:
            host: <label-studio-app-name>-ls-app.<workspace-name>.svc.cluster.local
            port:
              number: 80
  hosts:
    - <ds.organization.com/labelstudio>
  gateways:
    - istio-system/tfy-wildcard
Interacting with LabelStudio
Once you have deployed Label Studio on TrueFoundry, you can access the Label Studio UI via the provided endpoint. Let's explore how to label images for image classification using Label Studio.
1. Signing Up
When you open your hosted Label Studio, you'll be prompted to sign up for an account or log in if you already have one. Follow these steps:
- Visit your hosted Label Studio URL.
- Click on the "Sign Up" option if you don't have an account or "Log In" if you do.
- Complete the registration process. Once done, you'll have access to your Label Studio dashboard.
2. Setting Up a Labeling Project
Setting up a labeling project in Label Studio involves several steps, including defining the project name, importing the dataset, and configuring labeling tasks. Let's walk through these steps:
2.1 Creating a Labeling Project
After signing up and logging in, you can start creating your labeling projects. Follow these steps:
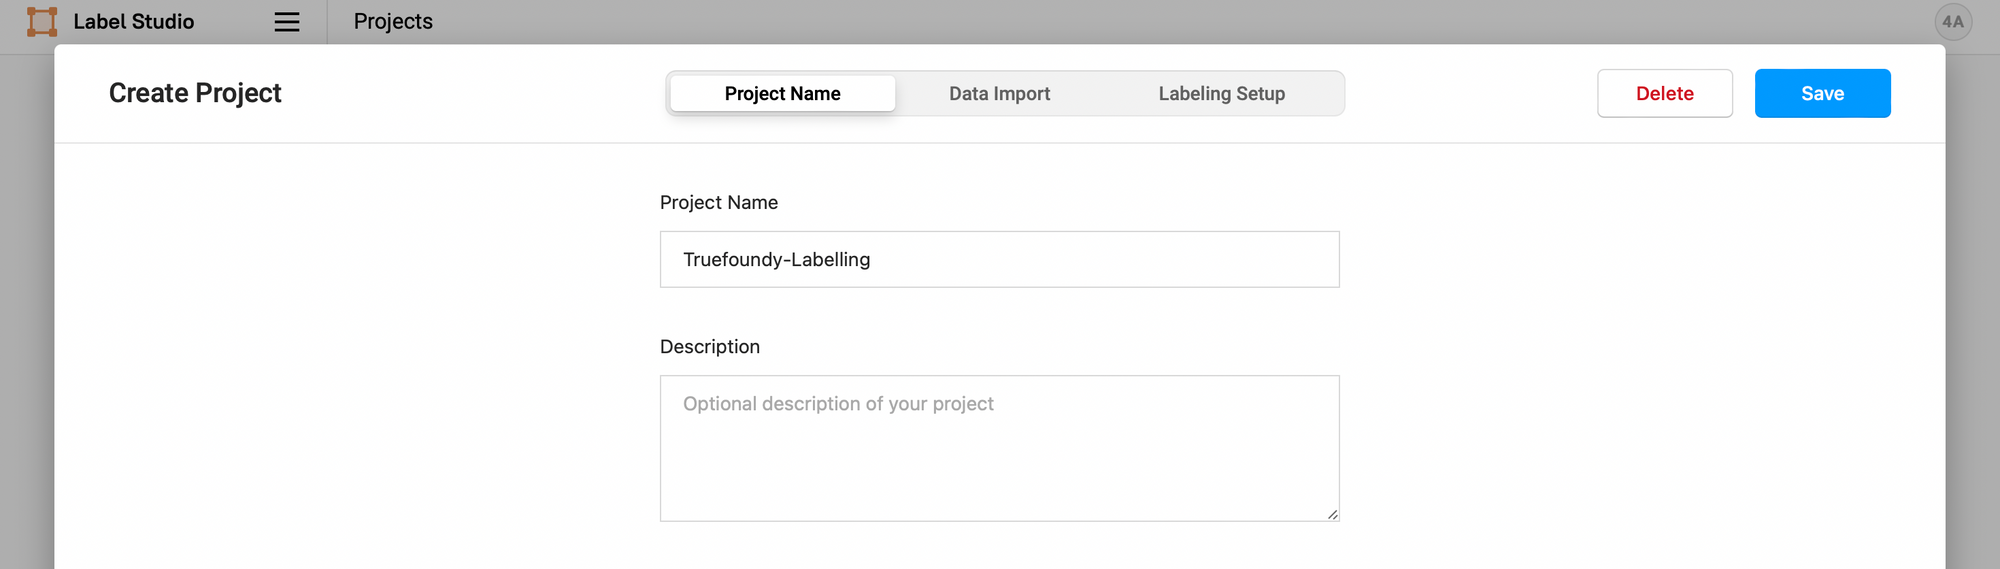
Project Name Tab:
- From your Label Studio dashboard, click on the "Create New Project" button.
- In the "Project Name" tab, enter a name for your project. This name should reflect the purpose or subject of your labeling project.
- Optionally, provide a project description to provide context and guidelines for labelers.
2.2 Importing the Dataset
Before you can begin labeling, you need to import the dataset you want to label. Label Studio supports various data types, including images, text, and audio. Here, we'll focus on importing images:
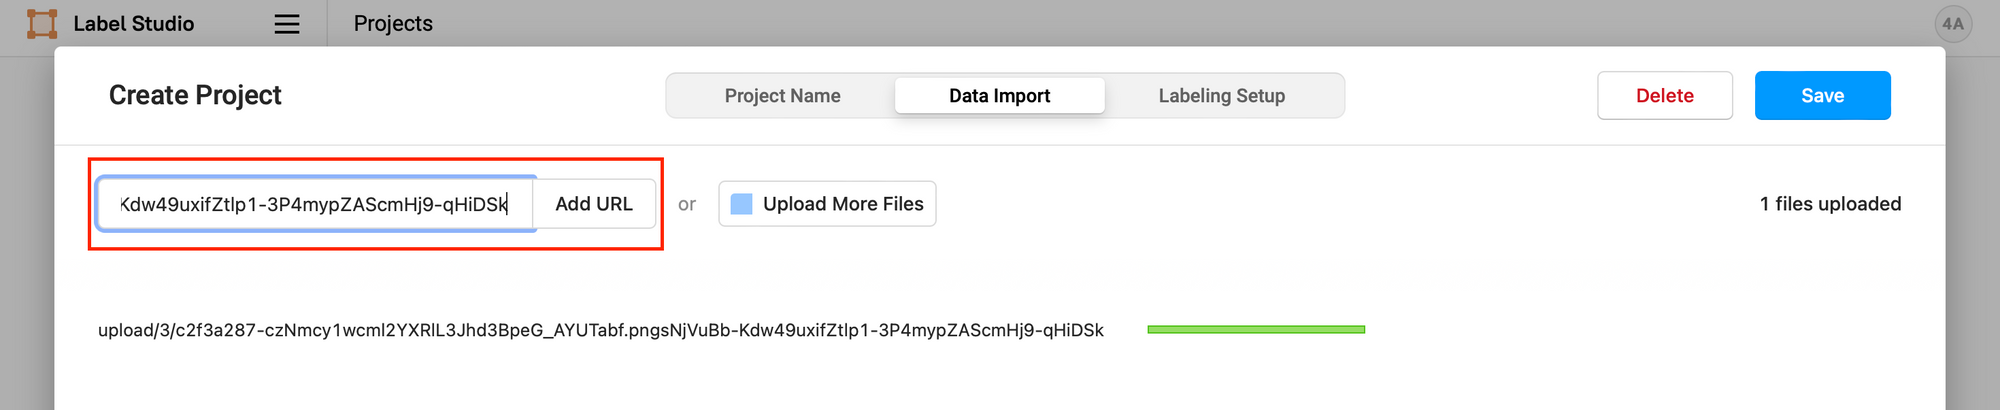
Data Import Tab:
- Navigate to the "Data Import" tab.
- You have two options for importing images:
- Upload images directly from your local computer.
- Provide URLs to the images if they are hosted online.
- For this example you can add the following urls as a dataset:
*
2.3 Labeling Tasks Setup
After importing your dataset, you need to set up labeling tasks that define what you want labelers to annotate or classify in the images. Follow these steps:
Labeling Setup Tab:
- Navigate to the "Labelling Setup Tab"
- Choose a template from the available options or customize one according to your needs. (For this example use Image Classification)
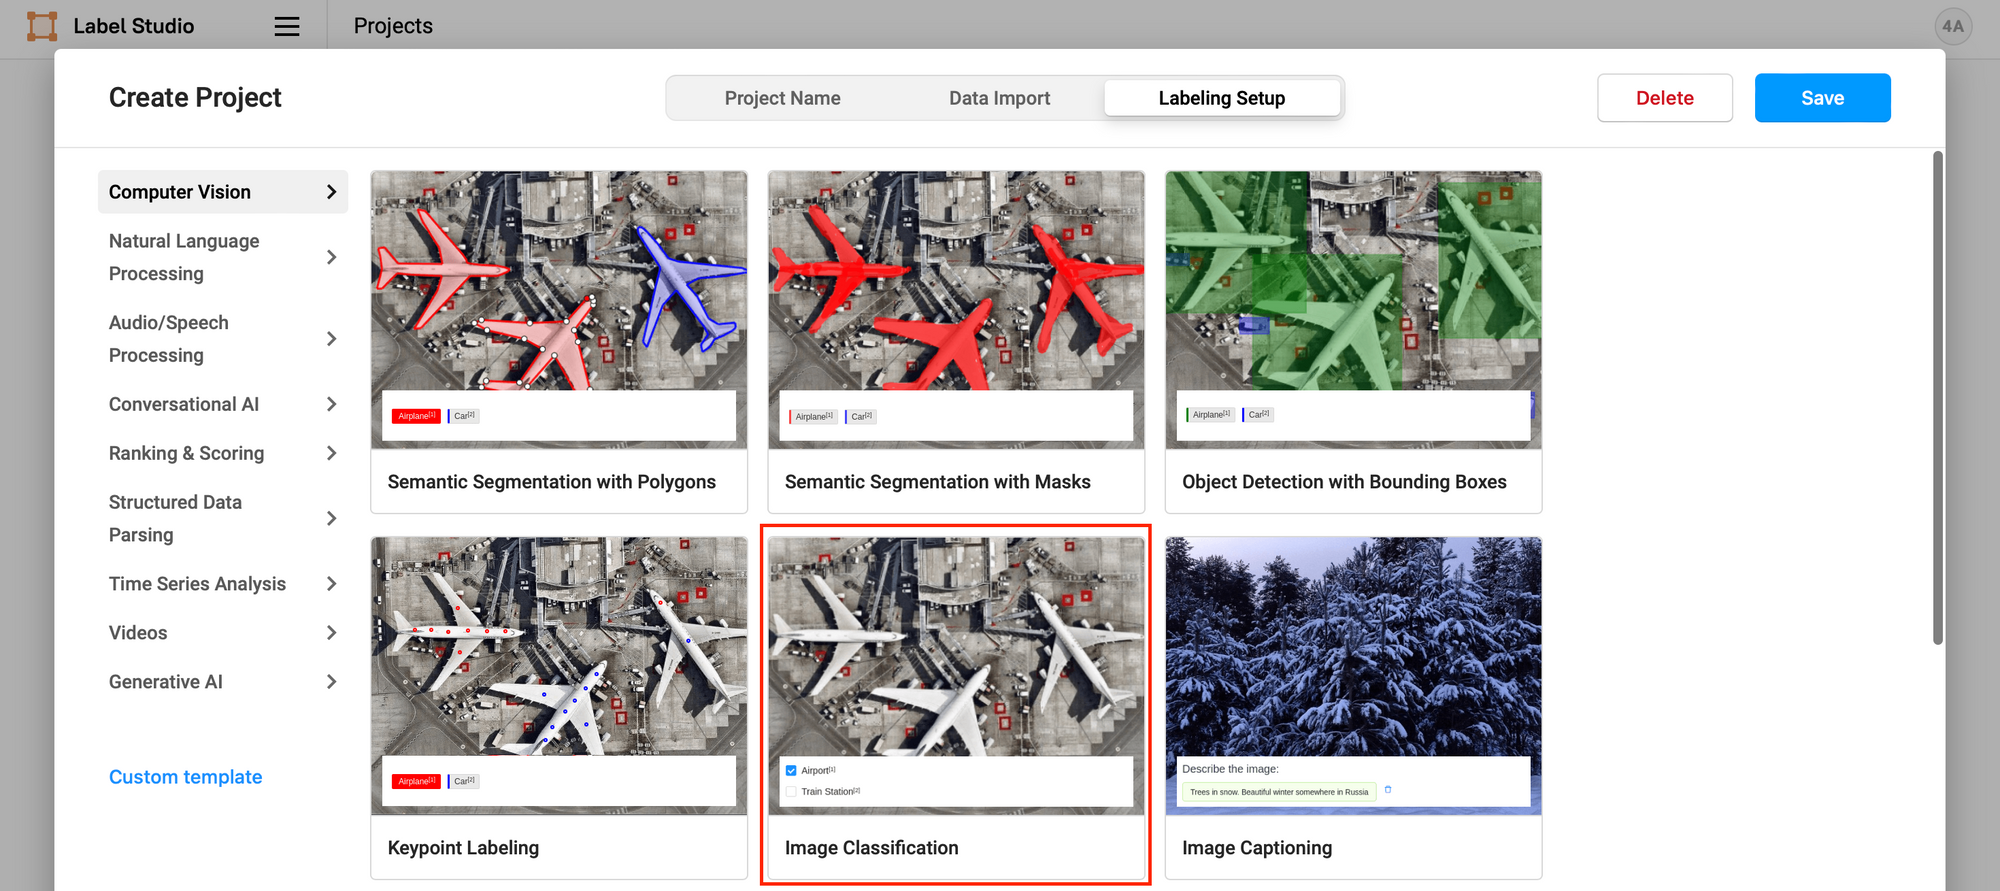
- Label Studio automatically selects the field to label based on your data.
- You can modify the selected field if necessary.
- Add label names on new lines. (Add Dog and Cat for our usecase)
- Optionally, you can choose new colors for the labels by clicking the label name and using the color selector.
- Configure any additional settings relevant to the labeling interface functionality.
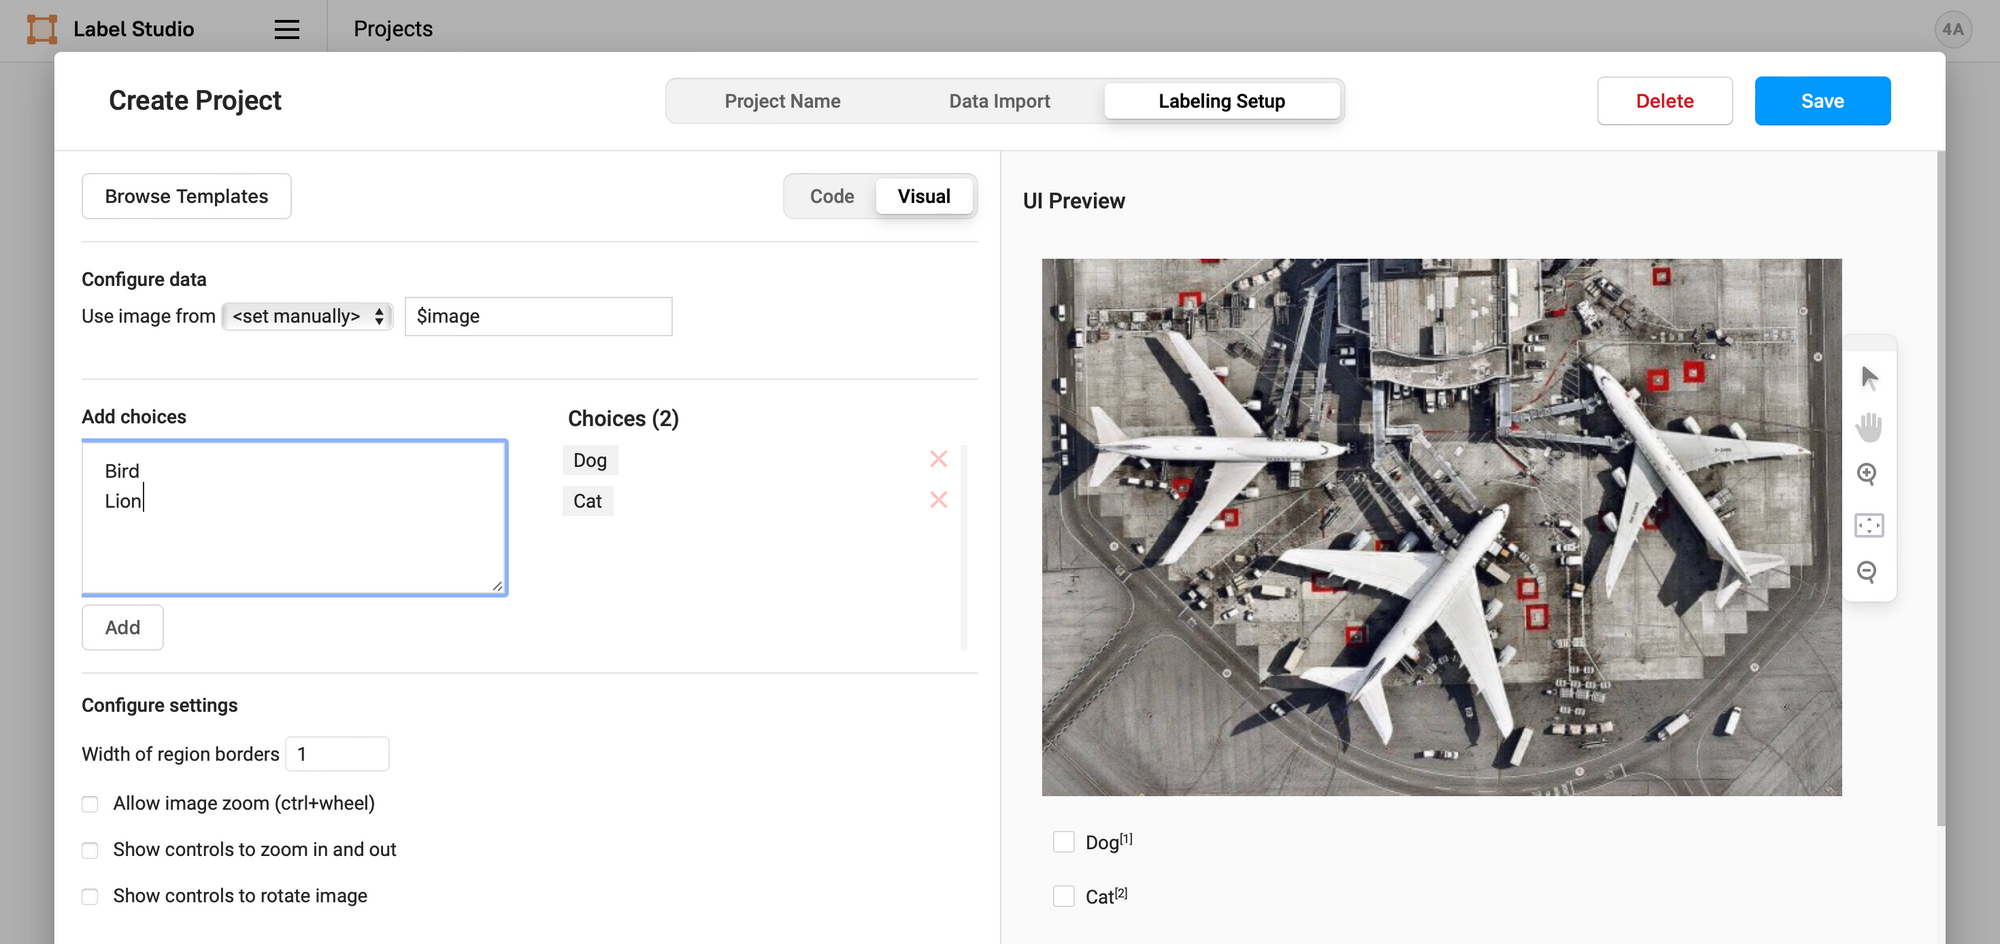
- Click "Save" to create the labeling task.
Your labelling project is now configured, and labellers can begin annotating or classifying images based on the defined task.
3. Labeling Process
3.1 Labeling Workflow
Once your project setup is complete, you'll be redirected to your project's Data Manager. Here, you can efficiently manage your dataset and labeling tasks. Follow these steps to initiate the labeling process:
- Access the Data Manager: After project setup, you'll be automatically redirected to the Data Manager for your project.
- Label Your Dataset: To label your dataset, click on the "Label All Tasks" button. This action will take you to the Labeling Dashboard.
- Labeling Dashboard: In the Labeling Dashboard, you can view images from your dataset and assign labels. For example, you may label images as either "dog" or "cat."

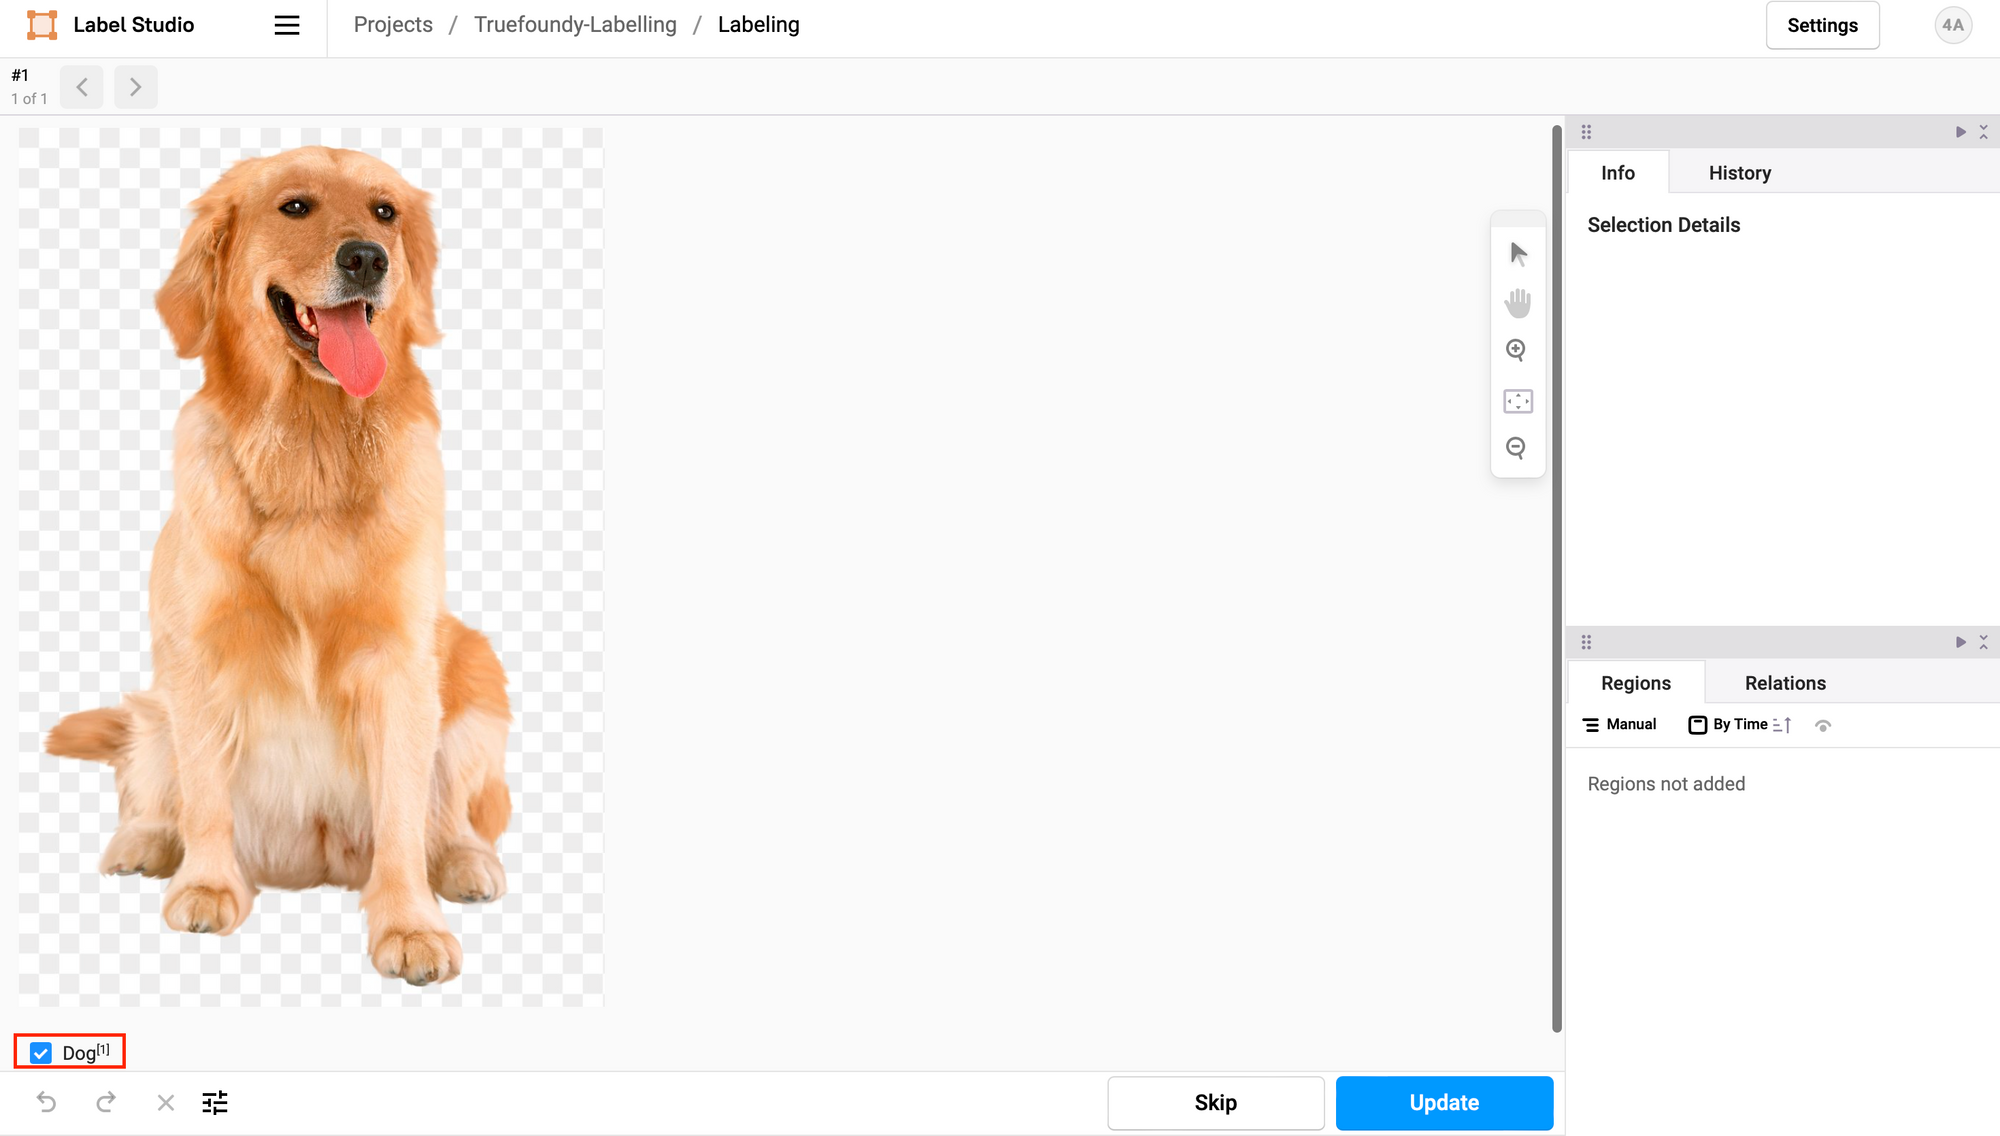
3.2 Data Manager View
In the Data Manager, you have several powerful tools at your disposal to efficiently manage your labeling project:
- Filter and Sort Data: You can easily filter and sort your project data based on various criteria, such as label status or annotator assignments.
- Save Filters as Tabs: Create custom filter configurations and save them as tabs for quick access. This feature helps you streamline your workflow, especially for large datasets.
- Assign Annotators to Tasks: Assign specific labeling tasks to annotators directly from the Data Manager. This feature ensures efficient task allocation.
- Delete Tasks or Annotations: If needed, you can delete specific tasks or annotations. This capability allows you to manage and clean your dataset as your project progresses.

3.3 Quality Control
To maintain high-quality labels throughout your project, consider implementing a review process:
- Reviewers Access: Designate reviewers who can access labeled data to verify label accuracy and quality.
- Discrepancy Resolution: Address any discrepancies or disputes that may arise among labelers. Resolving issues promptly ensures label consistency.
- Continuous Improvement: Use reviewer feedback and labeler input to iteratively enhance your labeling process, resulting in improved data quality over time.
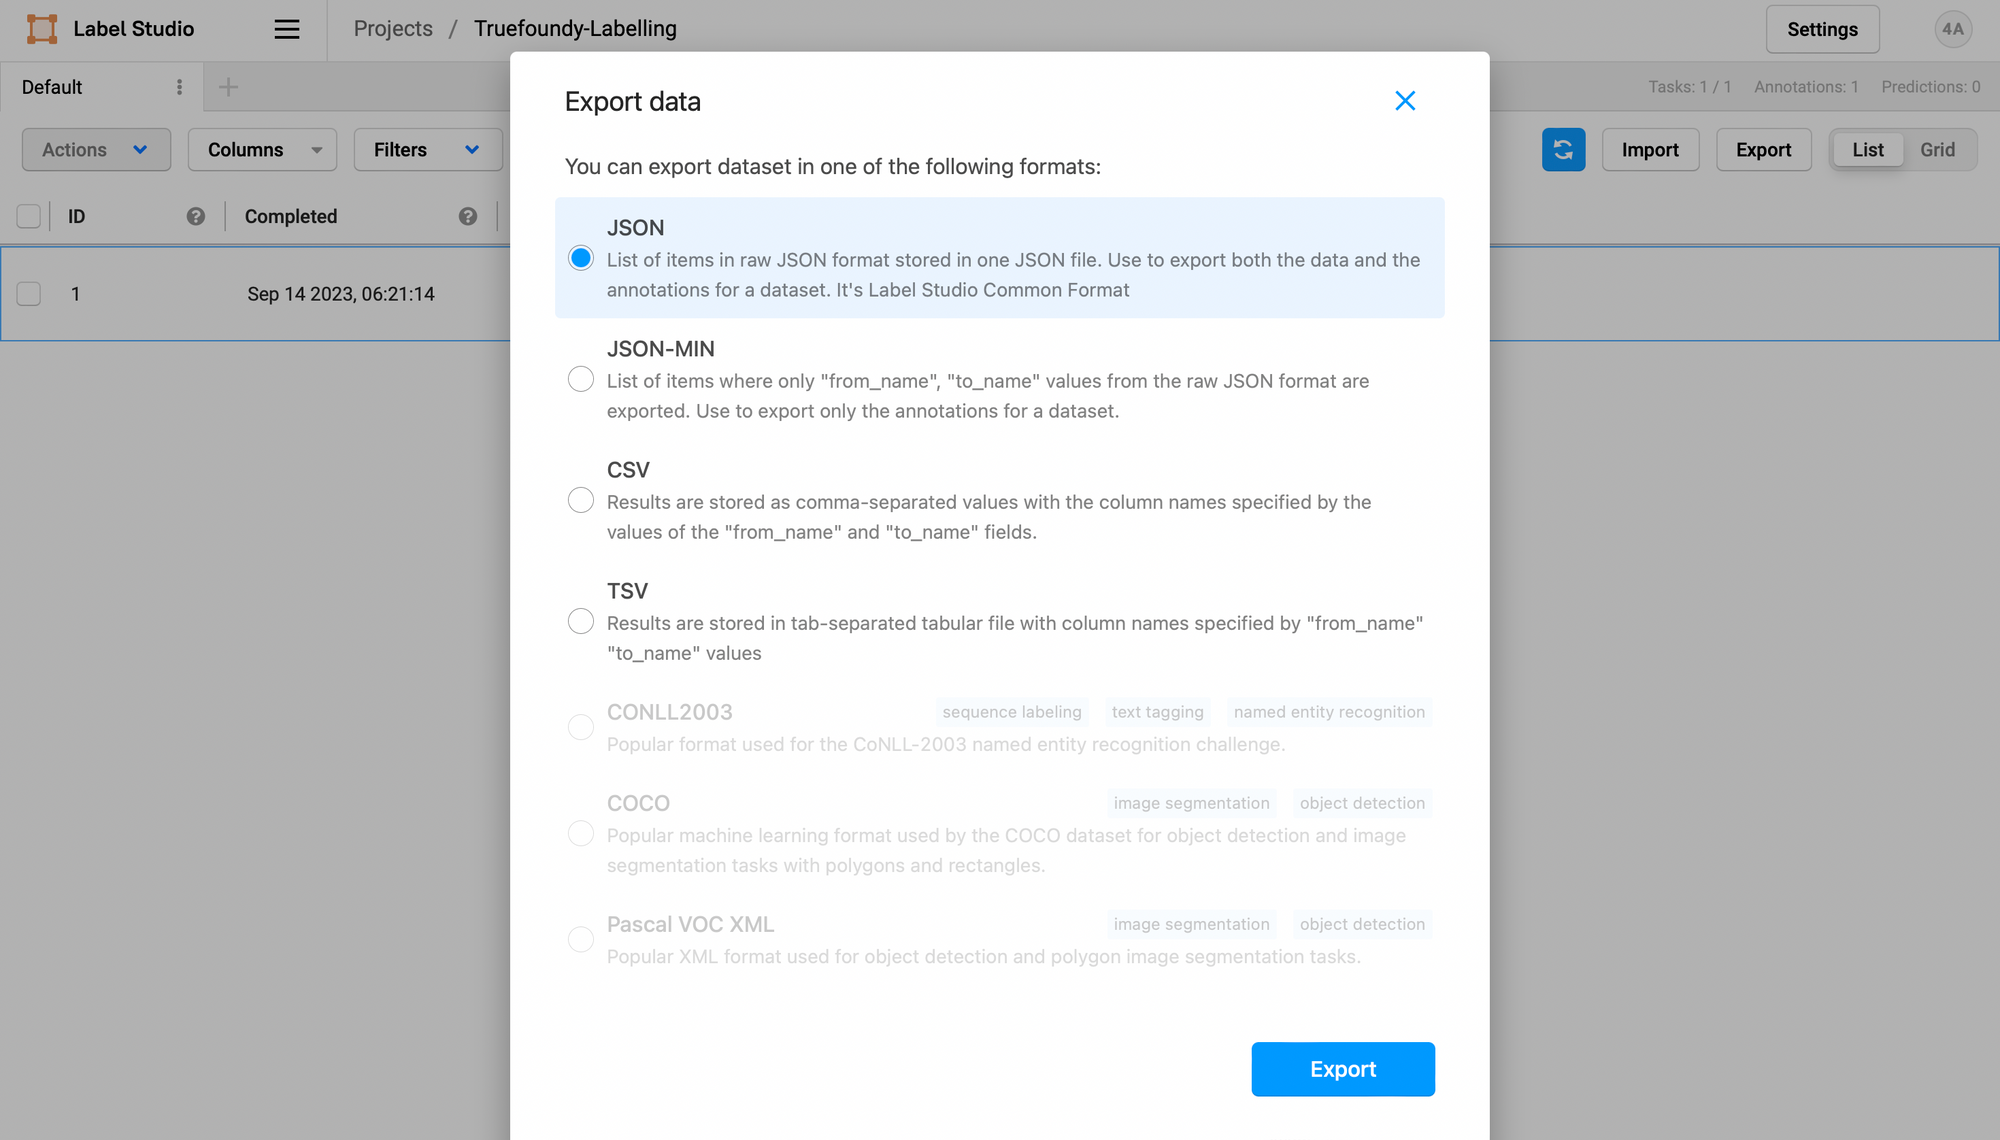
4. Exporting Labeled Data
Once you've completed the labeling process, you can export the labeled data for use in your machine learning projects or other applications.
- In your project, navigate to the "Export" tab.
- Choose the export format that best suits your needs, such as JSON, CSV, or others.
- Configure export settings, including which labeled data to include.
- Click "Export" to generate and download the labeled data in your chosen format.
Congratulations! You've successfully completed the labeling process and exported your labeled data for further use.
Your labelled data will be somewhat similar to this:
[
    {
        "id": 1,
        "annotations": [
            {
                "id": 1,
                "completed_by": 1,
                "result": [
                    {
                        "value": {
                            "choices": ["Dog"]
                        },
                        "id": "m2SBwNysux",
                        "from_name": "choice",
                        "to_name": "image",
                        "type": "choices",
                        "origin": "manual"
                    }
                ],
                "was_cancelled": false,
                "ground_truth": false,
                "created_at": "2023-09-14T00:51:14.067278Z",
                "updated_at": "2023-09-14T00:51:14.067302Z",
                "draft_created_at": null,
                "lead_time": 7.287,
                "prediction": {},
                "result_count": 0,
                "unique_id": "21bce98c-ef29-4725-8add-f5d6224441ec",
                "import_id": null,
                "last_action": null,
                "task": 1,
                "project": 3,
                "updated_by": 1,
                "parent_prediction": null,
                "parent_annotation": null,
                "last_created_by": null
            }
        ],
        "file_upload": "c2f3a287-czNmcy1wcml2YXRlL3Jhd3BpeG_AYUTabf.pngsNjVuBb-Kdw49uxifZtlp1-3P4mypZAScmHj9-qHiDSk",
        "drafts": [],
        "predictions": [],
        "data": {
            "image": "\/data\/upload\/3\/c2f3a287-czNmcy1wcml2YXRlL3Jhd3BpeG_AYUTabf.pngsNjVuBb-Kdw49uxifZtlp1-3P4mypZAScmHj9-qHiDSk"
        },
        "meta": {},
        "created_at": "2023-09-14T00:45:00.762438Z",
        "updated_at": "2023-09-14T00:51:14.111241Z",
        "inner_id": 1,
        "total_annotations": 1,
        "cancelled_annotations": 0,
        "total_predictions": 0,
        "comment_count": 0,
        "unresolved_comment_count": 0,
        "last_comment_updated_at": null,
        "project": 3,
        "updated_by": 1,
        "comment_authors": []
    }
]
Feel free to customize your Label Studio projects and workflows based on your specific requirements, leveraging Label Studio's powerful data labeling capabilities.
Read our previous blogs in the Machine Learning Tool Integrations Series
Keep watching the TrueML youtube series and reading all the TrueML blog series.
TrueFoundry is a ML Deployment PaaS over Kubernetes to speed up developer workflows while allowing them full flexibility in testing and deploying models while ensuring full security and control for the Infra team. Through our platform, we enable Machine learning Teams to deploy and monitor models in 15 minutes with 100% reliability, scalability, and the ability to roll back in seconds - allowing them to save cost and release Models to production faster, enabling real business value realisation.

Subscribe to our Newsletter

Delivered twice a month
Join AI/ML leaders for the latest on product, community, and GenAI developments


%20(11).png)