Building RAG using TrueFoundry and MongoDB Atlas
Introduction
Retrieval-Augmented Generation (RAG) combines the strengths of retrieval systems and generative models to produce highly relevant, context-aware outputs. It queries external knowledge sources—like databases or search indexes—to retrieve relevant information, which is then refined by a generative model.
Why RAG?
- Highly relevant and context-aware outputs.
- By incorporating dynamic and up-to-date knowledge, RAG systems overcome the limitations of static pretraining in generative models, making them highly effective for applications like question answering, knowledge-intensive tasks, and personalized content generation.
- The modular nature of RAG allows for optimization at both retrieval and generation stages, enabling greater flexibility and scalability in system design.
Cognita by TrueFoundry: Simplifying RAG for Scalable Applications
Despite its potential, implementing RAG can be complex, involving model selection, data organization, and best practices. Existing tools simplify prototyping but lack an open-source template for scalable deployment—enter Cognita.
Cognita is an open-source RAG framework that simplifies building and deploying scalable applications. By breaking RAG into modular steps, it ensures easy maintenance, interoperability with other AI tools, customization, and compliance. Cognita balances adaptability and user-friendliness while staying scalable for future advancements.
Advantages of Cognita
- A central reusable repository of parsers, loaders, embedders and retrievers.
- Ability for non-technical users to play with UI - Upload documents and perform QnA using modules built by the development team.
- Fully API driven - which allows integration with other systems.
- Large Language Models (LLMs) for easy interaction with generative models like OpenAI's GPT, Hugging Face models, or other LLM APIs.
- Prebuilt Integrations to easily connect to Pinecone, Weaviate, ChromaDB, or MongoDB Atlas Vector Search.
Why MongoDB for RAG?
Using MongoDB as a vector database for your Retrieval-Augmented Generation (RAG) application can be beneficial depending on your requirements. Here's why MongoDB could be a good choice:
1. Native Vector Search Support
MongoDB supports vector indexing through its Atlas Vector Search. This enables efficient similarity searches over high-dimensional data, which is central to RAG workflows. Key benefits:
- Integration with MongoDB's Query Language: Combines vector search with traditional queries, allowing more flexible and powerful query composition.
- High-performance search: Uses approximate nearest neighbor (ANN) algorithms like HNSW (Hierarchical Navigable Small World) for scalable and fast vector retrieval.
2. Unified Data Management
RAG applications often require managing both, unstructured data (e.g., text and embeddings) and structured data (e.g., metadata, user preferences).
MongoDB, being a document database, lets you store embeddings alongside their associated metadata in a single record. For example:
{
  "embedding": [0.1, 0.2, 0.3, ...],
  "text": "This is a sample document.",
  "metadata": {
    "source": "document_1",
    "timestamp": "2024-12-06T10:00:00Z"
  }
}
This avoids the complexity of managing embeddings in a separate system.
3. Flexibility and Scalability
Schema-less Design: MongoDB's schema flexibility makes it easy to iterate on your data model as your RAG application evolves.
Horizontal Scaling: MongoDB's sharding capability allows handling large datasets and scaling as your application grows.
Cloud-native Features: MongoDB Atlas provides fully managed services, including scaling, backups, and monitoring.
Implementing RAG with cognita + MongoDB
Step 1: Setting up MongoDB
For a video tutorial to see how to get your free MongoDB Atlas cluster click here.
- Set up a MongoDB Atlas account by visiting the Register page if you don’t have an account yet.

- To setup a cluster in the Overview tab, click “Create”, select the cluster as per your requirements and hit “Create Deployment”.

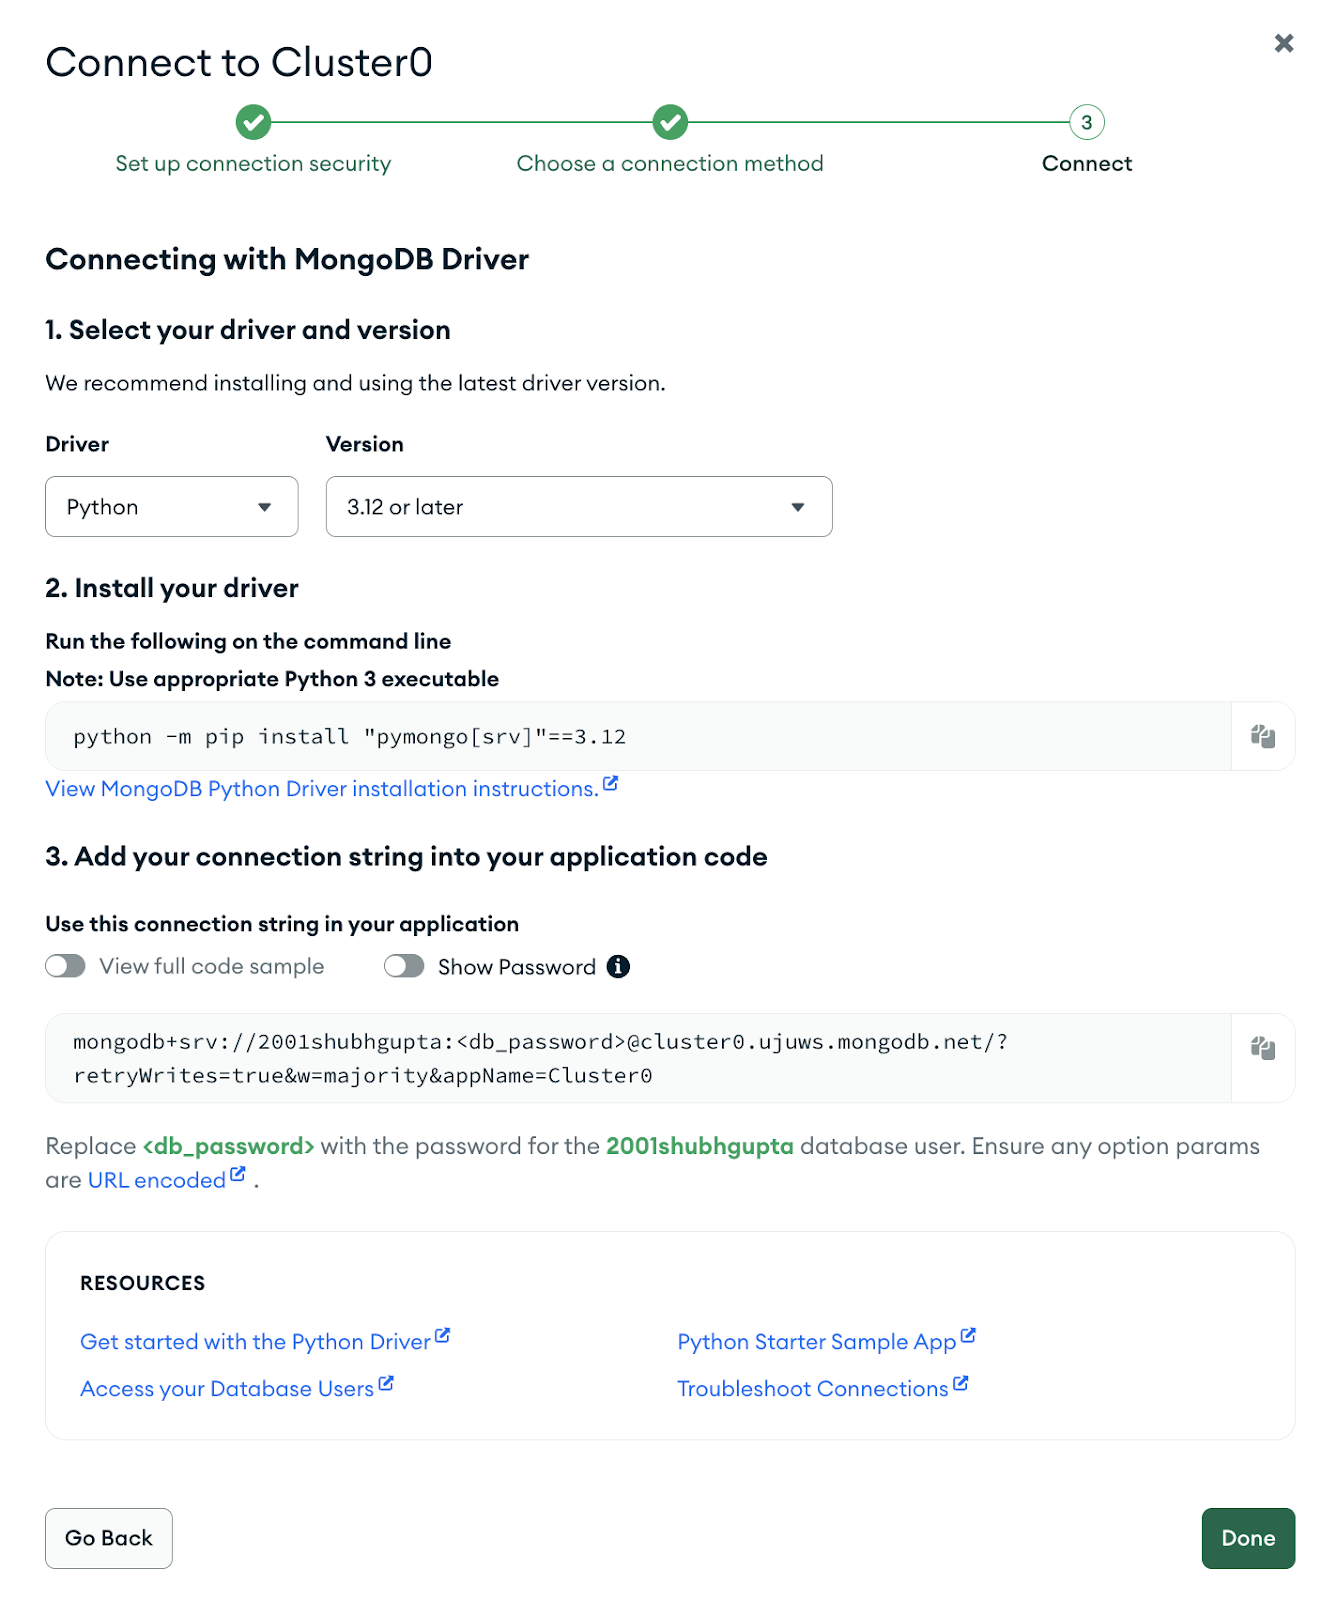
- For adding required authentications, in the “Connect to Cluster” window, create a database user.
- Connect with MongoDB driver
- Choose the python version
- The connection string will have your username and password. Copy the connection string. This would be used in the next step.

Step 2: Setting up Cognita to use MongoDB
- Clone the cognita github repository: https://github.com/truefoundry/cognita/tree/main
- Before starting the services, we need to configure model providers that we would need for embedding and generating answers. To start, copy models_config.sample.yaml to models_config.yaml.
cp models_config.sample.yaml models_config.yaml
- Create a mongo db collection in the newly created database, say “cognita”. This is the collection where all the chunks will be stored and used in the retrieval process.
- The compose file uses the compose.env file for environment variables. You can modify it as per your needs.
- Edit the “VECTOR_DB_CONFIG” key in the environment file. This config will be used in the bootstrap process to ensure that MongoDB will be used as a vector store throughout run time. The connection string for the mongo DB will be used here. Following is an example of how this would look like:
VECTOR_DB_CONFIG='{"provider":"mongo","url":"mongodb+srv://username:password@clustername.mongodb.net/?retryWrites=true&w=majority&appName=Cluster0", "config": {"database_name": "cognita"}}'
- By default, the config has local providers enabled that need infinity and an ollama server to run embedding and LLMs locally. However, if you have a OpenAI API Key, you can uncomment the openai provider in models_config.yaml and update OPENAI_API_KEY in compose.env. Now, you can run the following command to start the services:
docker-compose --env-file compose.env --profile ollama --profile infinity up
- The compose file will start the following services
- cognita-db - Postgres instance used to store metadata for collections and data sources.
- cognita-backend - Used to start the FastAPI backend server for Cognita.
- cognita-frontend - Used to start the frontend for Cognita.
- Once the services are up, you can access the frontend at http://localhost:5001.
Step 3: Set up a data collection in Cognita
Once you have set cognita up, the following steps will showcase how to use the UI to query documents:

1. Create Data Source
- Click on Data Sources tab
- Click + New Datasource
- Data source type can be either files from local directory, web url, github url or providing Truefoundry artifact FQN.E.g: If Localdir is selected, upload files from your machine and click Submit.
- Created Data sources list will be available in the Data Sources tab.
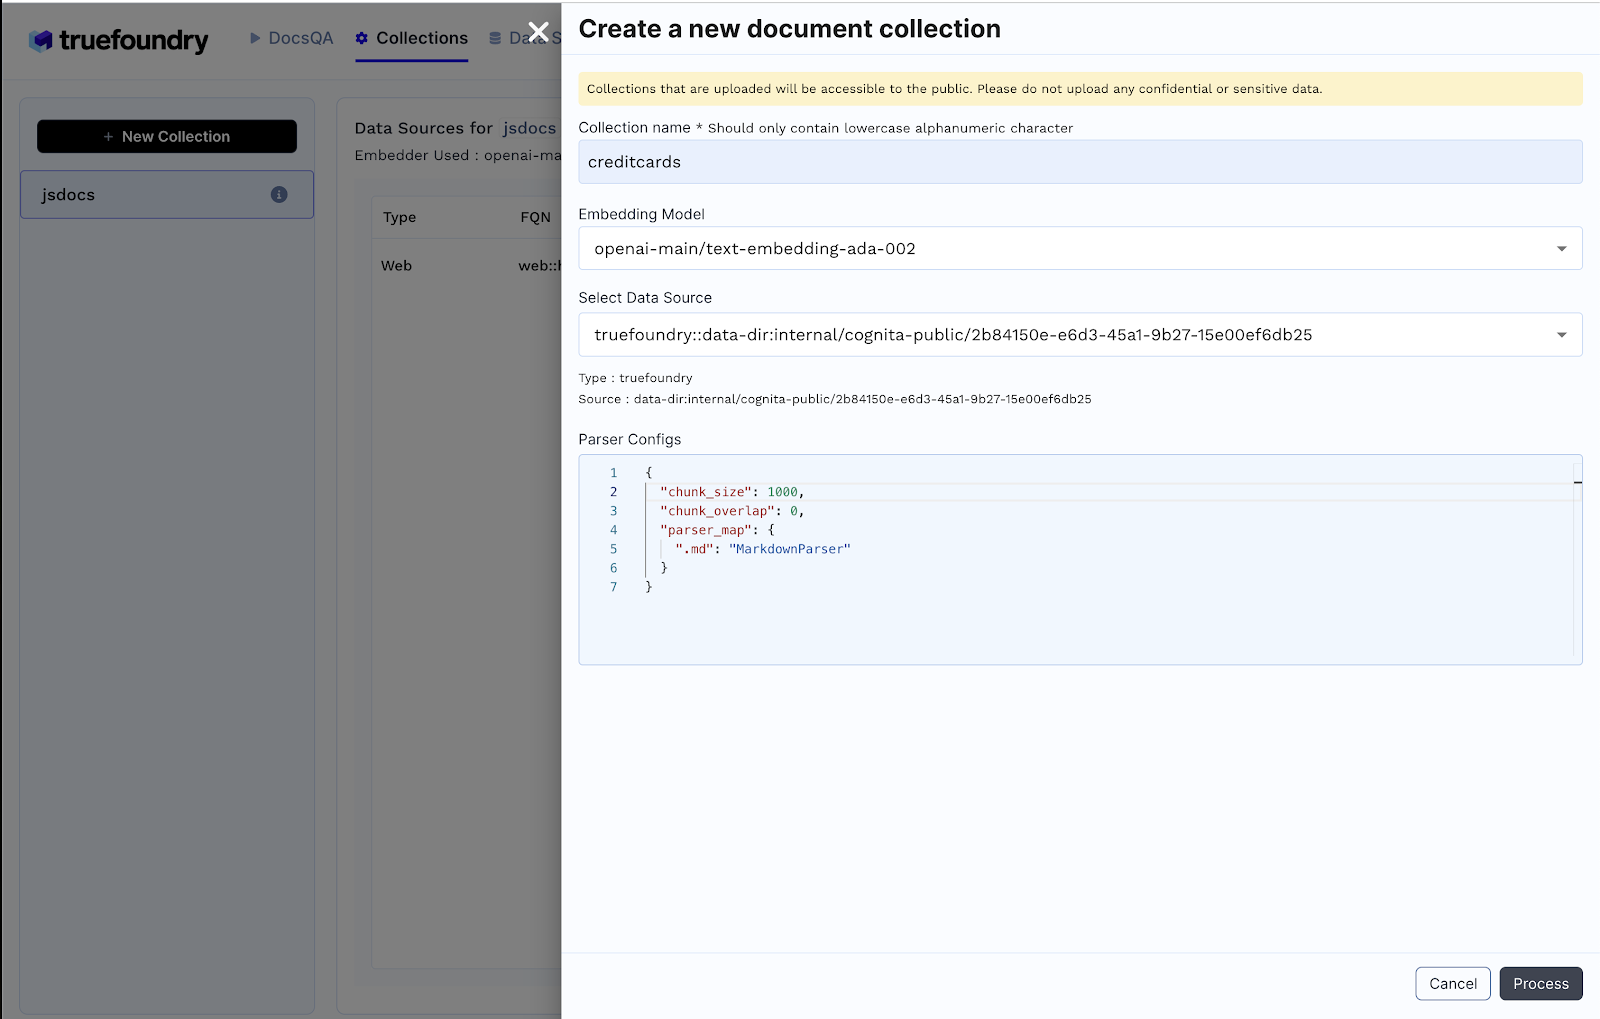
2. Create Collection
- Click on Collections tab

- Click + New Collection

- Enter Collection Name
- Select Embedding Model
- Add earlier created data source and the necessary configuration
- Click Process to create the collection and index the data

3. Upon creating a new collection, Here is what what happens behind the scenes
- Create a new collection in the configured MongoDB database. For instance, if the name of the database is `cognita`, this step creates a collection with the given input name in the cognita database in mondo db.
- Upon creating a collection, a vector search index is created using the following code snippet:
from pymongo.operations import SearchIndexModel

search_index_model = SearchIndexModel(
            definition={
                "fields": [
                    {
                        "type": "vector",
                        "path": "embedding",
                        "numDimensions": self.get_embedding_dimensions(embeddings),
                        "similarity": "cosine",
                    }
                ]
            },
            name="vector_search_index",
            type="vectorSearch",
        )

        # Create the search index
        result = self.db[collection_name].create_search_index(model=search_index_model)
This ensures that the newly created collection is ready for vector search queries. Note that creating an index on MongoDB may take up to a minute.
4. As soon as you create the collection, data ingestion begins, you can view its status by selecting your collection in the collections tab. This step is responsible for parsing your files, chunking them and adding them to your MongoDB. You can also add additional data sources later on and index them in the collection. Move to the next step once the Status is “Completed”.

Step 4: Find the right config for your application

- In the DocsQA tab, use Cognita’s playground to play with the different settings in order to see what works best for your application. You can try out different:
- Retrieval techniques
- LLM models, temperatures, etc.
- LLM prompts
- Embedding models
- Whichever setting works best for your application, hit “Create Application” for that and an API endpoint will be deployed for your application. You can go to the “Applications” tab to see all your deployed applications.
Conclusion
This tutorial demonstrated how to build a production-ready RAG application using Cognita and MongoDB in just 10 minutes. The synergy between Cognita's adaptability and ease of use and MongoDB's flexible document model with vector search offers a robust foundation for creating advanced AI application.
Built for Speed: ~10ms Latency, Even Under Load
Blazingly fast way to build, track and deploy your models!
- Handles 350+ RPS on just 1 vCPU — no tuning needed
- Production-ready with full enterprise support
TrueFoundry AI Gateway delivers ~3–4 ms latency, handles 350+ RPS on 1 vCPU, scales horizontally with ease, and is production-ready, while LiteLLM suffers from high latency, struggles beyond moderate RPS, lacks built-in scaling, and is best for light or prototype workloads.


