


November 13, 2025
|
5 min read

ChatGPT is a powerful language model that can understand and respond to user inputs. It has many useful features built-in, but sometimes users need additional functionality that isn't available out of the box. That's where plugins come in.
Plugins are add-ons that extend the capabilities of ChatGPT. They allow users to access up-to-date information, run computations, or interact with third-party services in response to a user's request. For example, a plugin could add the ability to search for information within a specific website or integrate with a user's CRM software.
Or a calendar plugin for ChatGPT might work by allowing users to schedule events and reminders directly in the chat interface. For example, a user could type "schedule meeting with John on Friday at 2 PM" and ChatGPT can recognise the intent and communicate with the calendar plugin to create the event.
0:00/1×
Instacart ChatGPT Plugin in action
The Instacart plugin for ChatGPT is an existing plugin that enables users to conveniently add recipe ingredients to their Instacart cart without leaving the chat interface. For instance, if a user asks "What ingredients do I need to make lasagna?", ChatGPT can provide a list of ingredients required for lasagna and offer to add them to the user's Instacart cart. The user can then confirm the order with a simple click, and the Instacart plugin will automatically add all the necessary ingredients to their cart.
To create a plugin, developers can make an API available through their website and create a manifest file that outlines the API in a standardised manner. ChatGPT can then read these files and enable the AI models to communicate with the API specified by the developer. A typical plugin includes:
ChatGPT will use the manifest file and OpenAPI schema to understand what the plugin does and how to interact with it. Then when the user prompts ChatGPT, it will determine if it needs to interact with any active plugins to accomplish the request and call the relevant endpoints to accomplish user requests. Just like with prompting other language models, you will want to test out multiple prompts and descriptions in the manifest and API schema to see what works best.
OpenAI provides code for a sample plugin that can search a vector DB like Pinecone and return relevant documents. While answering user prompts, ChatGPT may use this plugin to append its knowledge by querying for relevant documents. For example, within an organisation, ChatGPT might need to query internal company documents to answer questions pertaining to the company.
For this document retrieval plugin, the manifest file named ai-plugin.json will look something like this:
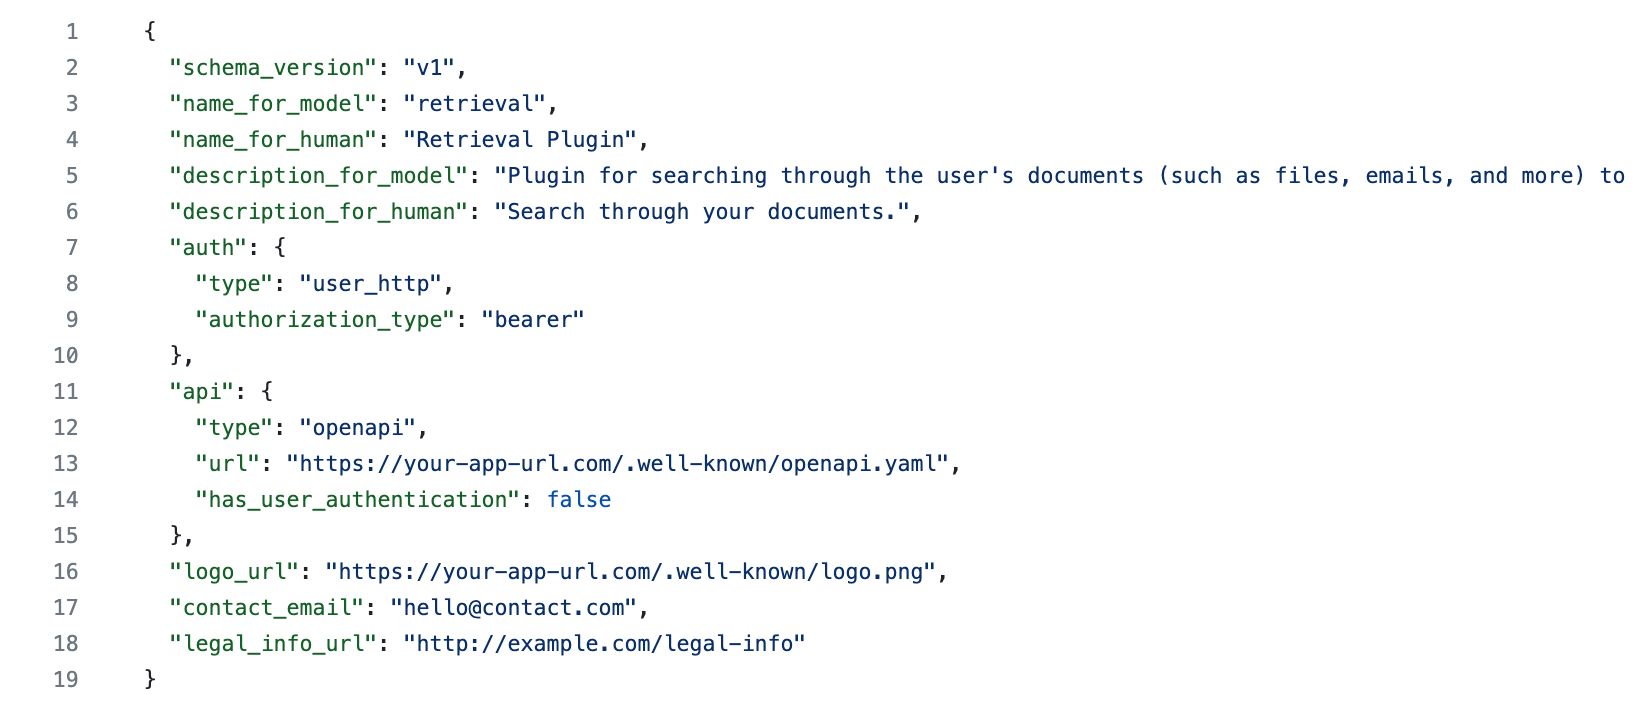
Notice how there are fields like description_for_model and description_for_human. The description_for_model attribute gives you the freedom to instruct the model on how to use your plugin generally. Overall, the language model behind ChatGPT is highly capable of understanding natural language and following instructions. Therefore, this is a good place to put in general instructions on what your plugin does and how the model should use it properly.
We will deploy the above retrieval plugin on TrueFoundry and hook it up with ChatGPT. The plugin can search vector databases like Pinecone and return relevant documents.
💡
Note that you'll need ChatGPT Plugin access to create a plugin. You can request access for one here.
To deploy this application, you'll need to clone this repository. This is required since we'll eventually need to update the OpenAPI schema and the manifest with the subsequent URLs of the deployed plugin application.
Pinecone is a managed vector database built for speed, scale, and shipping to production sooner. To use Pinecone as your vector database provider, first get an API key by signing up for an account. You can access your API key from the "API Keys" section in the sidebar of your dashboard. Pinecone also supports hybrid search and at the time of writing is the only datastore to support SPLADE sparse vectors natively.
A full Jupyter notebook walkthrough for the Pinecone flavour of the retrieval plugin can be found here. There is also a video walkthrough here.
The app will create a Pinecone index for you automatically when you run it for the first time. Just pick a name for your index and set it as an environment variable while deploying the application.
Now let's deploy the application on TrueFoundry.
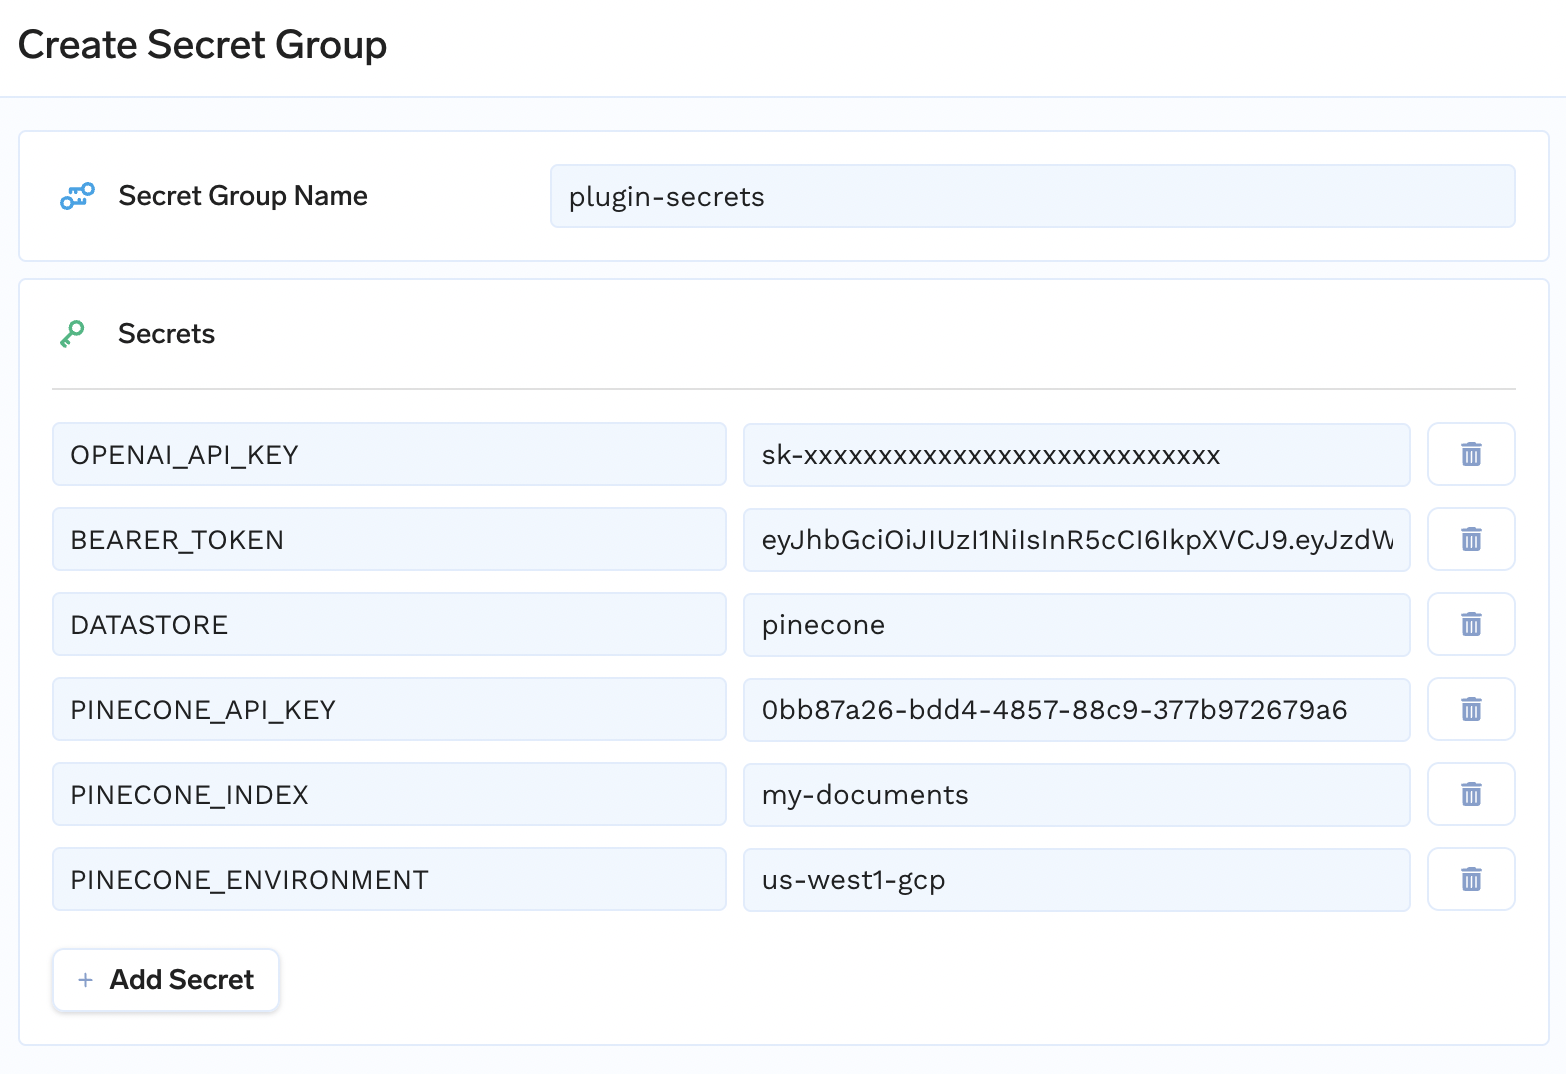
2. While using the Pinecone vector DB, you'll need the following environment variables. The bearer token will be used to authenticate requests to the endpoints.
NameRequiredDescriptionDATASTOREYesDatastore name, set this to pineconeBEARER_TOKENYesYour secret token for authenticating requests to the APIOPENAI_API_KEYYesYour OpenAI API key for generating embeddings with the text-embedding-ada-002 modelPINECONE_API_KEYYesYour Pinecone API key, found in the Pinecone consolePINECONE_ENVIRONMENTYesYour Pinecone environment, found in the Pinecone console, e.g. us-west1-gcp, us-east-1-aws, etc.PINECONE_INDEXYesYour chosen Pinecone index name. Note: Index name must consist of lower case alphanumeric characters or '-'
Go to the TrueFoundry secrets console. Create a new secret group and create secrets to use an environment variables.
3. Go to the deployment console. Create a new service in your workspace.
4. In the create service form, set the source to the repo URL that you just cloned and the build to DockerFile build.
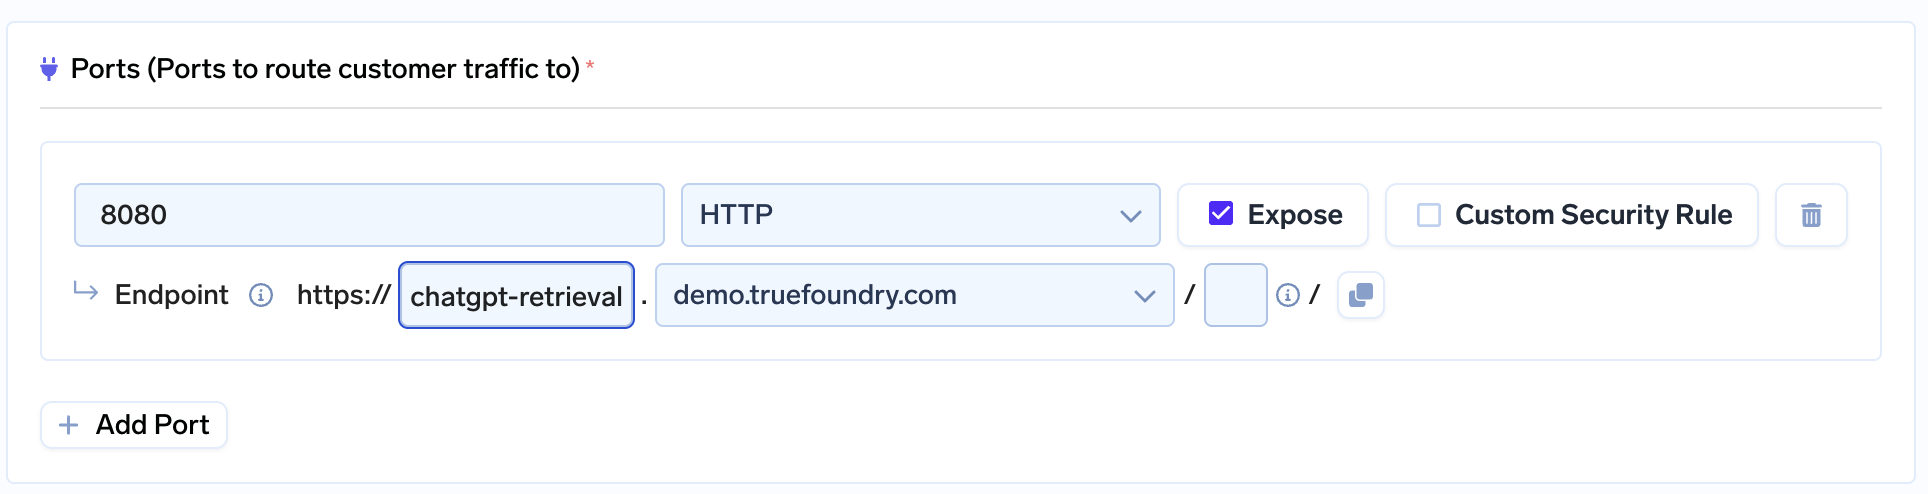
5. In the form, set the port to 8080 and choose a suitable endpoint for your service:
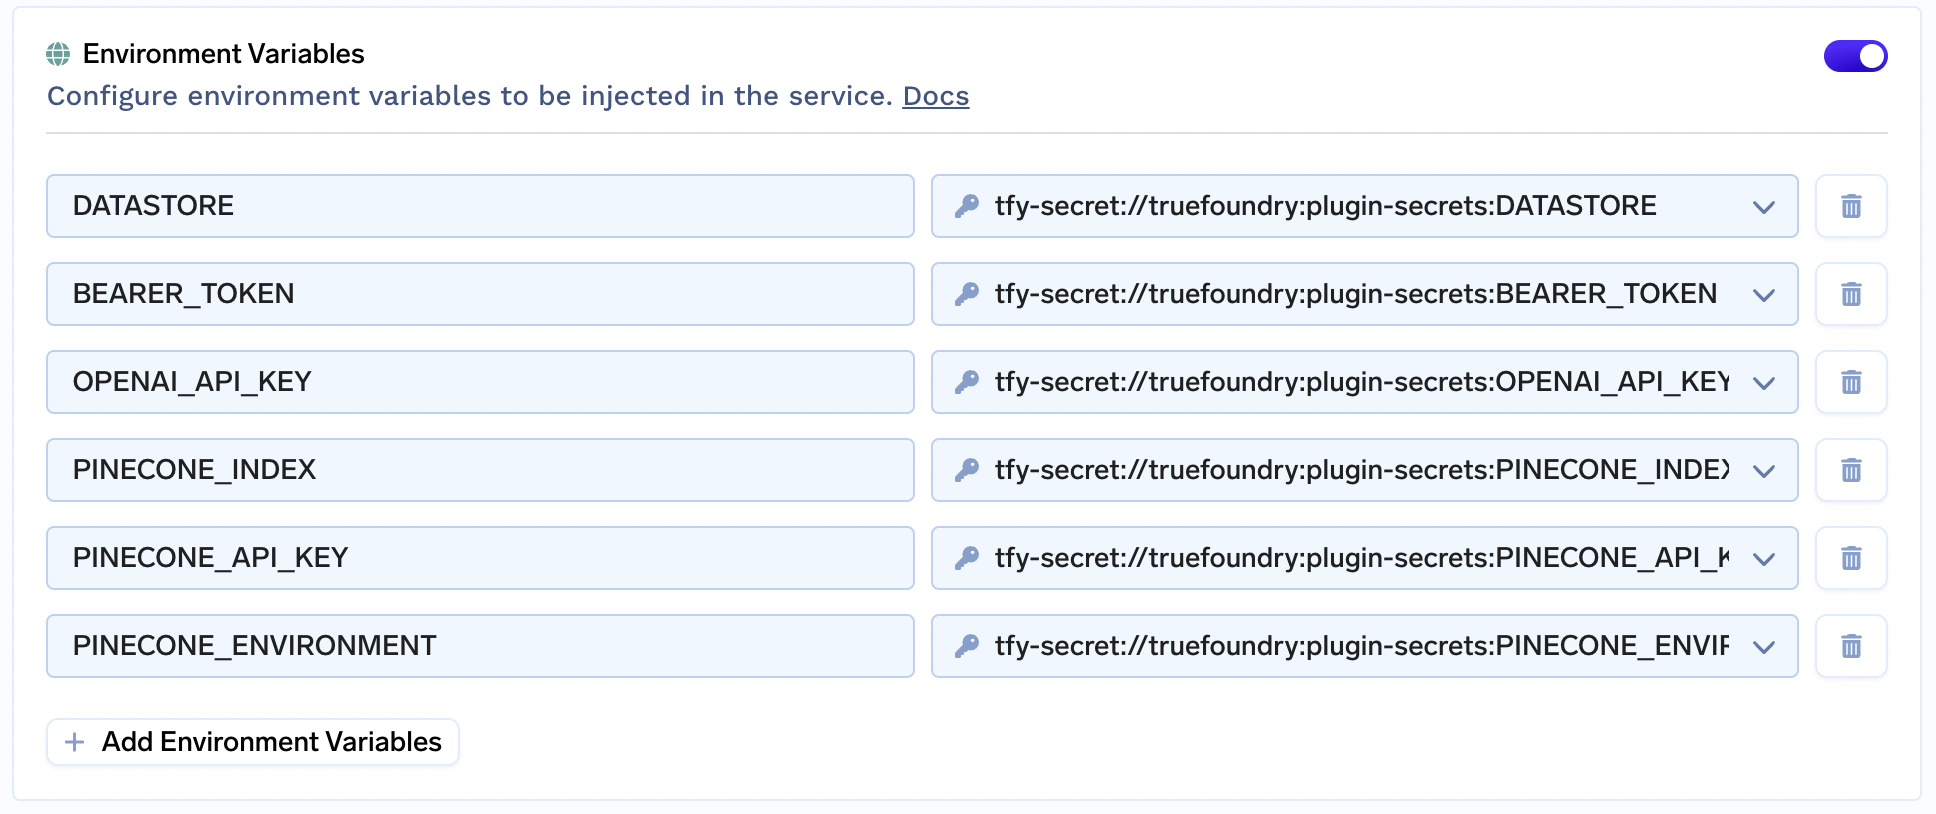
6. Add the environment variables and set them to the secrets you just created.
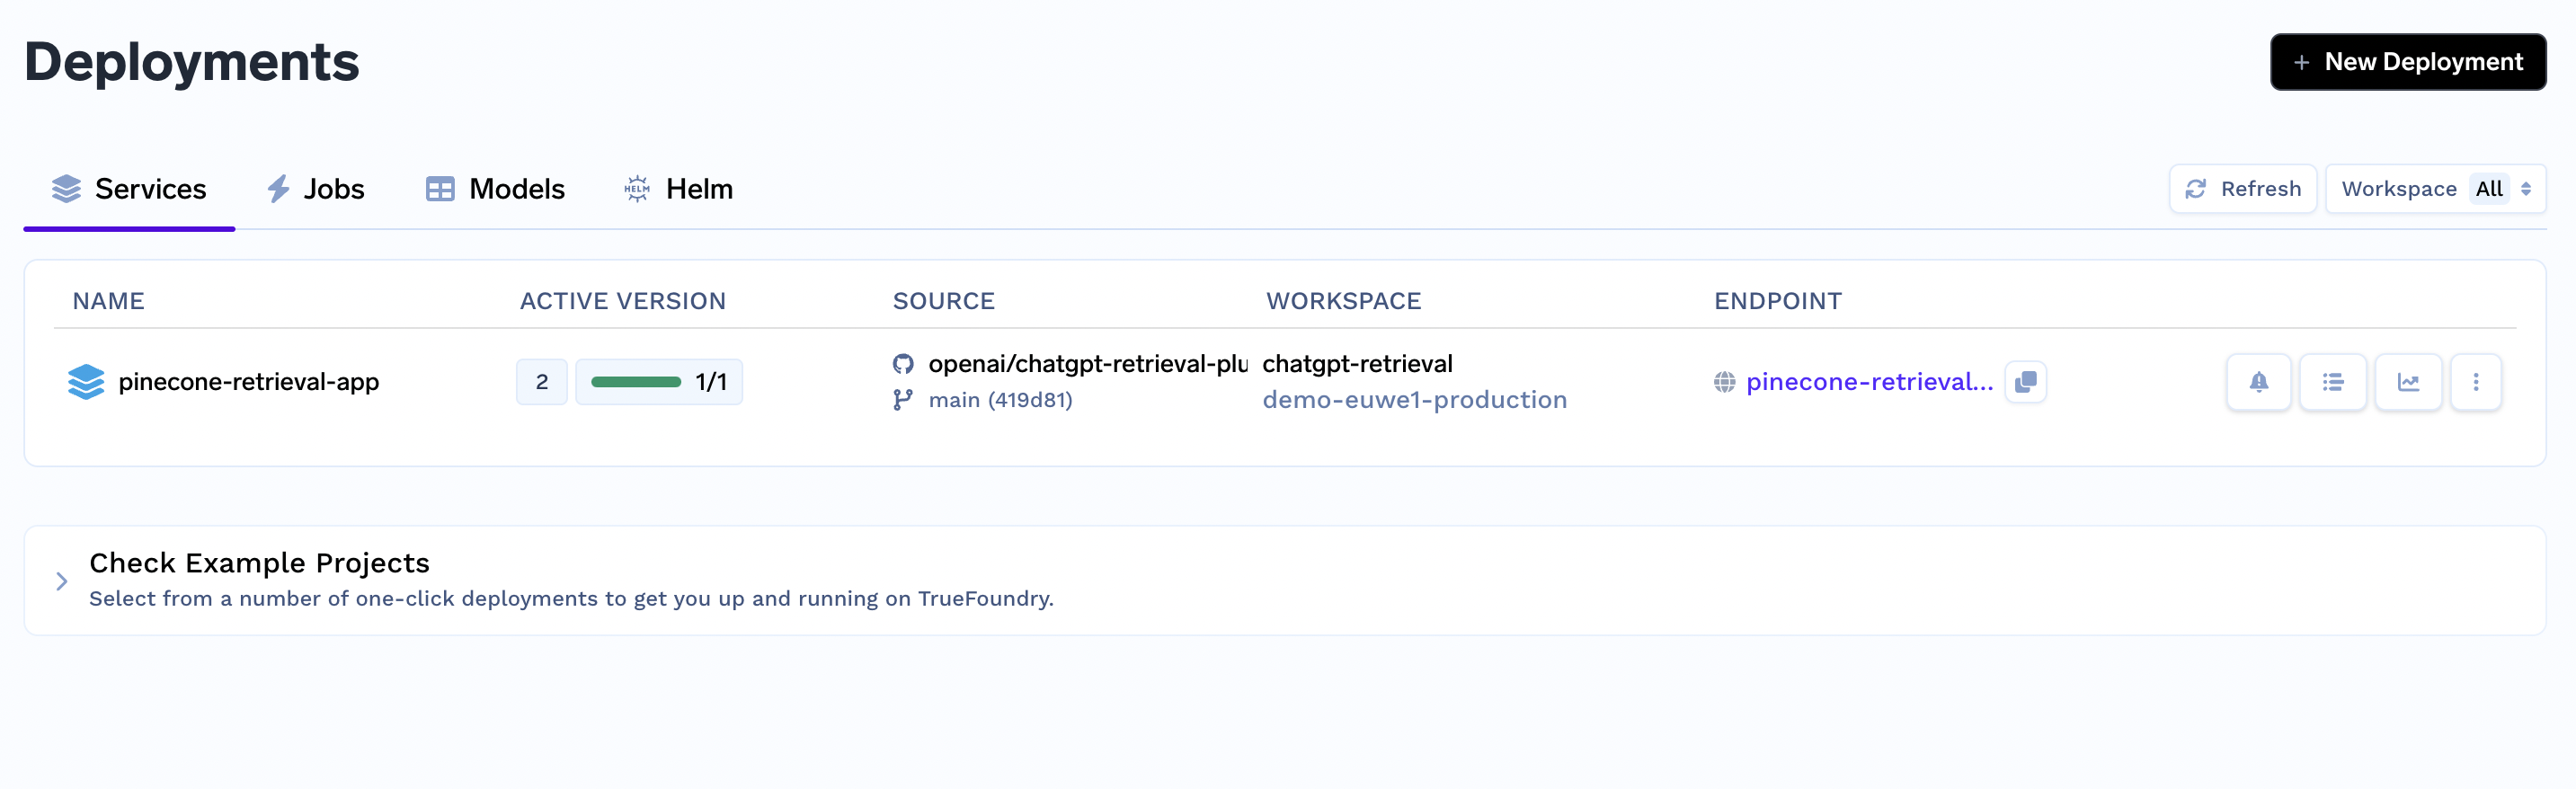
7. Deploy and your plugin webapp and endpoint should show up in the deployments tab. We'll use the endpoint generated here to register the plugin on OpenAI to use with ChatGPT:
8. Go to your Github repo and update the application URL in both the OpenAPI schema and manifest located in the ./well-known folder. Once updated, you can edit the deployment on TrueFoundry to the latest commit and re-deploy from the deployments tab.

Once you have created the API, manifest file, and OpenAPI specification for your API, you are now ready to connect the plugin via the ChatGPT UI.
For the ChatGPT UI, first select “Develop your own plugin” to set it up and then “Install an unverified plugin” to install it for yourself.
First, you'll need to provide the endpoint to your API service. You can get this from the TrueFoudry deployments tab. Secondly, you'll need to provide the bearer token used to authenticate API requests. Once that is done, the plugin should be ready for use with ChatGPT (only for you, since it's unverified!).
Blazingly fast way to build, track and deploy your models!
TrueFoundry AI Gateway delivers ~3–4 ms latency, handles 350+ RPS on 1 vCPU, scales horizontally with ease, and is production-ready, while LiteLLM suffers from high latency, struggles beyond moderate RPS, lacks built-in scaling, and is best for light or prototype workloads.


The latest news, articles, and resources sent to your inbox
© 2025 All rights reserved.


.png)


