Top Tools for Fine-tuning
Introduction
Fine-tuning is a technique used in machine learning, especially deep learning, where a pre-trained model is further trained or "tuned" on a smaller, specific dataset tailored to a particular task.
Suppose you're developing a model that generates technical manuals for electronics using GPT-3 (a large language model with 175 billion parameters), but the generic output from GPT-3, isn't meeting the required technical accuracy and tone.
In this case, you can think of retraining the model for your specific use case but directly training a model like GPT-3 from scratch to address this niche task is impractical due to the computational resource requirement and specialized data.
Here's where fine-tuning comes into play.
Fine-tuning is like teaching GPT-3 a new trick. It already knows a lot about languages thanks to its training on numerous texts from books to websites. Your job is to further train it on a targeted dataset— in this case, a corpus of existing technical manuals and documentation specific to electronics.
Some basic methods of fine-tuning:
- Layer Freezing: Selectively freezing the weights of certain layers while allowing others to update during the fine-tuning process.
- Learning Rate Adjustment: Adjusting the rate at which the model learns during the fine-tuning process, typically to prevent overwriting valuable pre-learned knowledge.
- Adding Task-Specific Layers: This involves extending the model architecture with new layers that are directly trained for the task.
Parameter Efficient Fine Tuning
Parameter Efficient Fine-tuning (PEFT) is a technique aimed at minimizing the number of additional parameters required during the fine-tuning of pre-trained neural network models,
This helps cut down on computational expenses and memory usage while still maintaining or even enhancing performance PEFT achieves this by adding prompt embeddings as extra model parameters and tuning only a small number of extra parameters.
PEFT also require a much smaller dataset as compared to traditional fine-tuning.
Steps to perform PEFT
- Loading the chosen model
Load your chosen model using a machine learning framework such as TensorFlow, PyTorch, or Hugging Face's Transformers library. These frameworks provide APIs to download and load pre-trained models easily.
Here is a sample code:
- Prompt Engineering
Before fine-tuning, you must experiment with different prompts to guide the model's responses. Test various prompts with the pre-trained model to see how they affect the output and choose the most appropriate one. You can also change different parameters like max_length, temperature, etc.
It's like figuring out the best way to ask your question so the model understands what you want.
- Dataset
In a dataset for fine-tuning, there are typically two parts: Prompt (Input) and Answer (Output). The Prompt is like a question or a starting point, and the Answer is what you want the model to generate in response to that question. It can be in the form of columns or a sequence of text entries (more common).
The best prompt identified in the last step will be used here and the Answer will be exactly what we want the model to produce when given that Prompt.
- Fine-Tuning the Model
This is where you teach the model to get better at your task. You’ll use the dataset to adjust the model’s “knowledge” slightly.
Here's a simplified overview of setting up and running the fine-tuning process with PyTorch:
- Setting Up for Training:
from transformers import AdamW
optimizer = AdamW(model.parameters(), lr=5e-5) # lr is the learning rate
- Training Loop:
Tools for Fine-Tuning
When exploring tools for prompt engineering, it's helpful to categorize them into two main domains: Code Platforms and No-Code Platforms. This distinction simplifies the selection process
Code Platforms refer to platforms that provide virtual machines which can be used to run your custom Python script for fine-tuning like the one mentioned before. Meanwhile, No-Code Platforms refer to tools that require simple or no Python script to run. It has a dedicated UI where you can start training with a few clicks.
No-Code Platforms:
No-code platforms, on the other hand, are tailored for simplicity and ease of use. They eliminate the need for writing Python scripts, offering an intuitive UI where training can be initiated with just a few clicks. This domain is suited for users without programming knowledge or those who prefer a straightforward approach to prompt engineering.
1. TrueFoundry
TrueFoundry is a tool that helps ML teams get their models up and running smoothly. It's built on Kubernetes, which means it can run on different clouds or even on your own servers. This is important for businesses worried about keeping their data safe and controlling costs
For Fine-tuning, It is one of the best tools out there, catering to both beginners and experts. Here you have two options, deploying a fine-tuning notebook for experimentation or launching a dedicated fine-tuning job.
- Notebooks: Experimentation Playground
Notebooks offer an ideal setup for explorative and iterative fine-tuning. You can experiment on a small subset of data, trying different hyperparameters to figure out the ideal configuration for the best performance.
- Jobs: Reliable and Scalable
Once you've identified the optimal hyperparameters and configuration through experimentation, transitioning to a deployment job helps you fine-tune on whole dataset and facilitates rapid and reliable training.
Therefore, notebooks are strongly recommended for early-stage exploration and hyperparameter tuning and deployment jobs are the preferred choice for large-scale LLM finetuning, particularly when the optimal configuration has been established through prior experimentation.
Here's a step-by-step guide to fine-tune using both Notebook and Jobs:
- Setting up the Training Data
Truefoundry supports two different data formats:
- Chat: Data needs to be in JSONL format with each line containing a whole conversation in OpenAI Chat format
Each line contains a key called messages. Each message key contains a list of messages, where each message is a dictionary with role and content keys. The role key can be either user, assistant or system and the content key contains the message content.
- Completion: Data needs to be in JSONL format with each line containing a JSON encoded string containing two keys prompt and completion.
2. Fine-Tuning
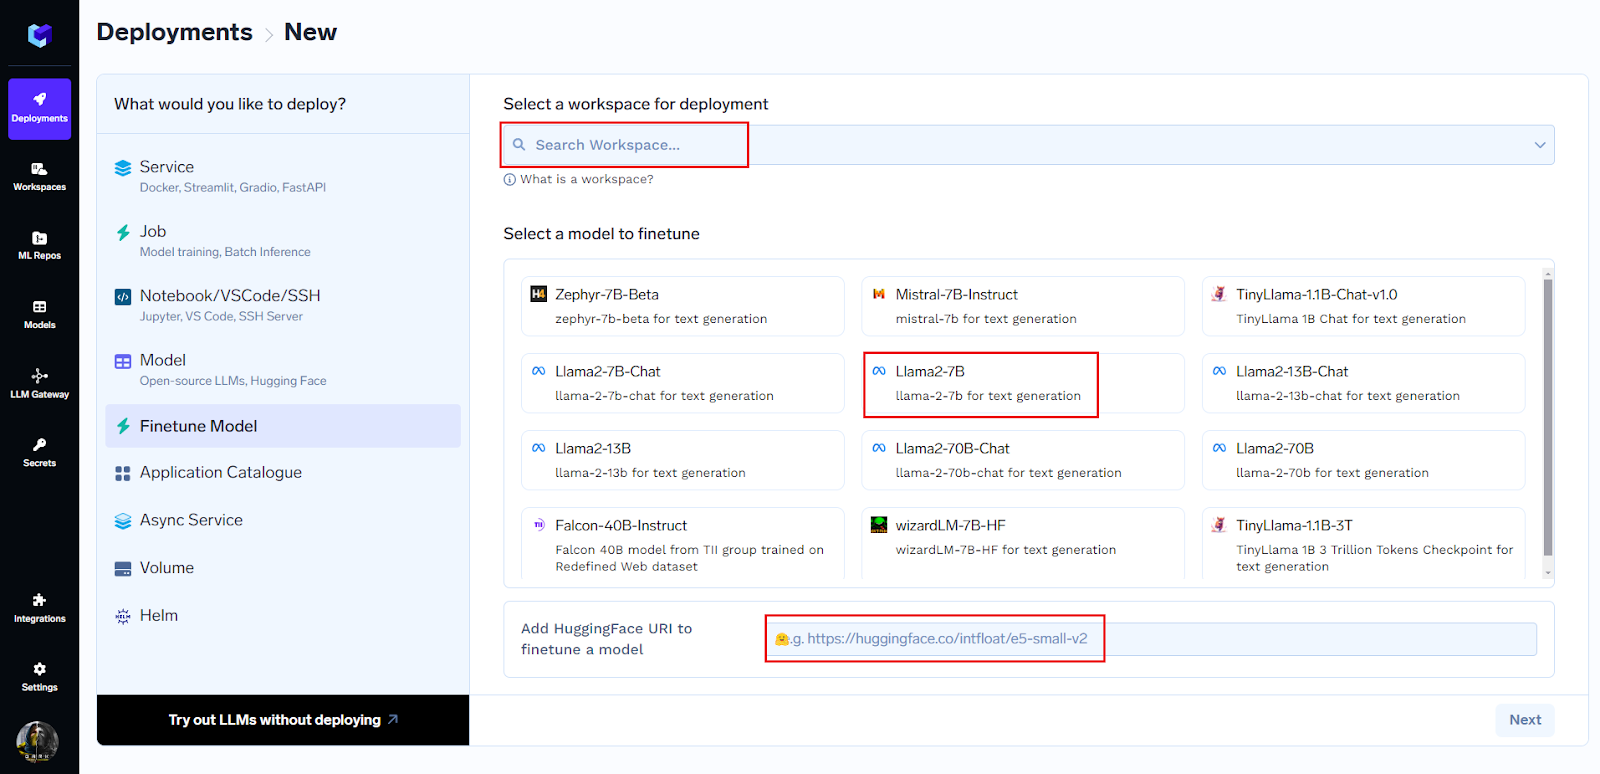
You can begin fine-tuning by just three clicks:
- Select workspace where you want to work
- Choose model:
You can choose model from the comprehensive list present or can just paste the huggingface URL to begin fine-tuning.
- Click on Next
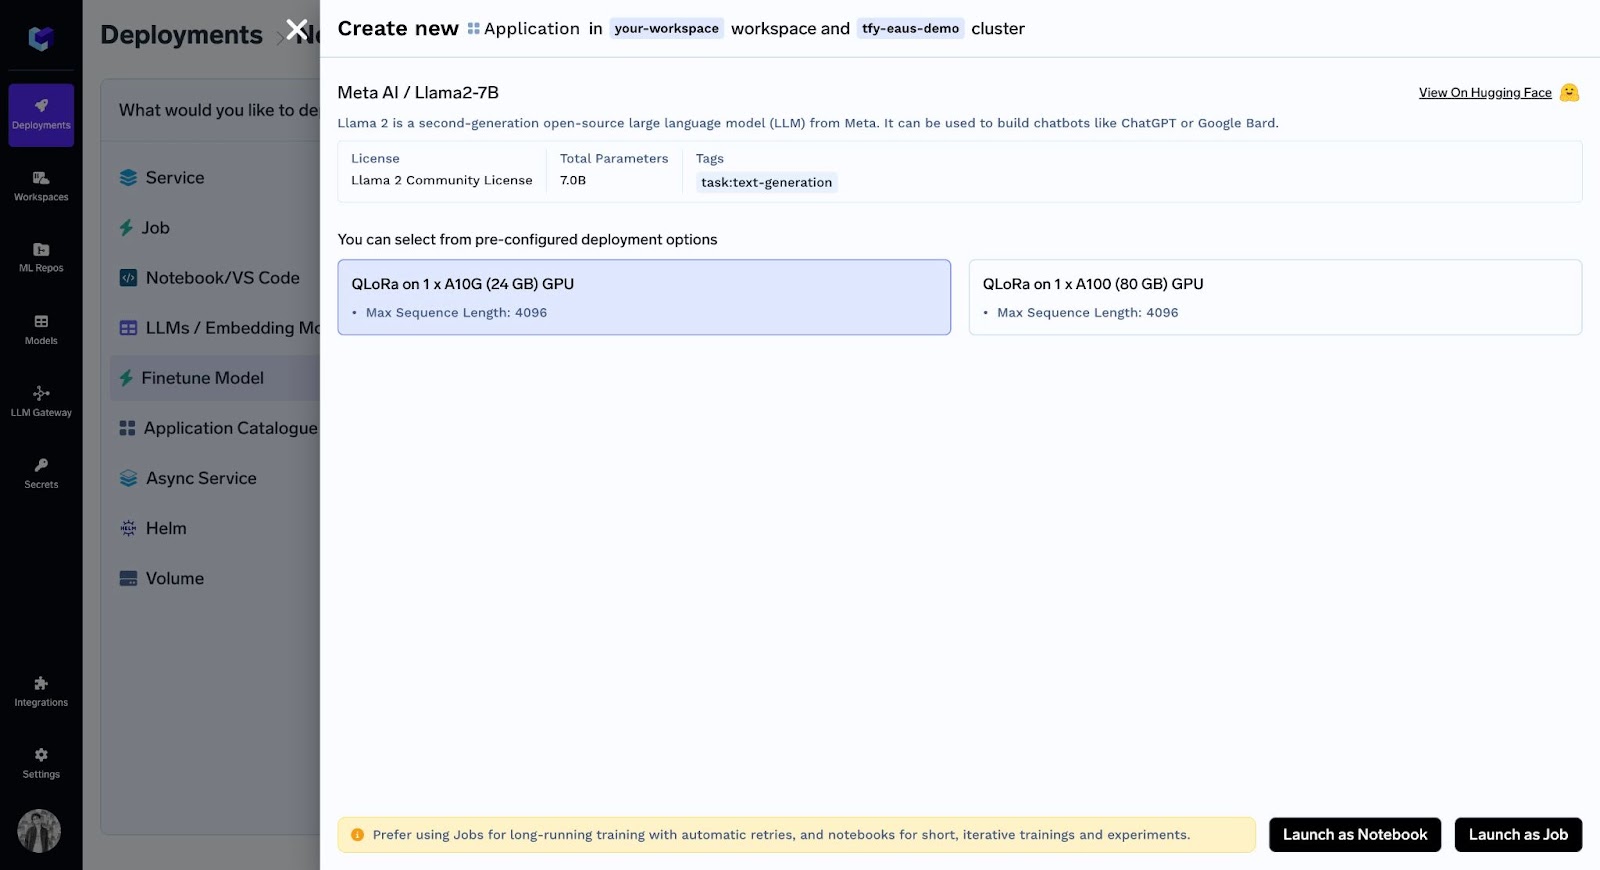
Now after selecting the desired GPU, you have two options: Run as notebook or Job.
3. Fine-Tuning using a Notebook
After choosing ‘Launch as Notebook’ and selecting default values for hyperparameters, you can see you notebook:
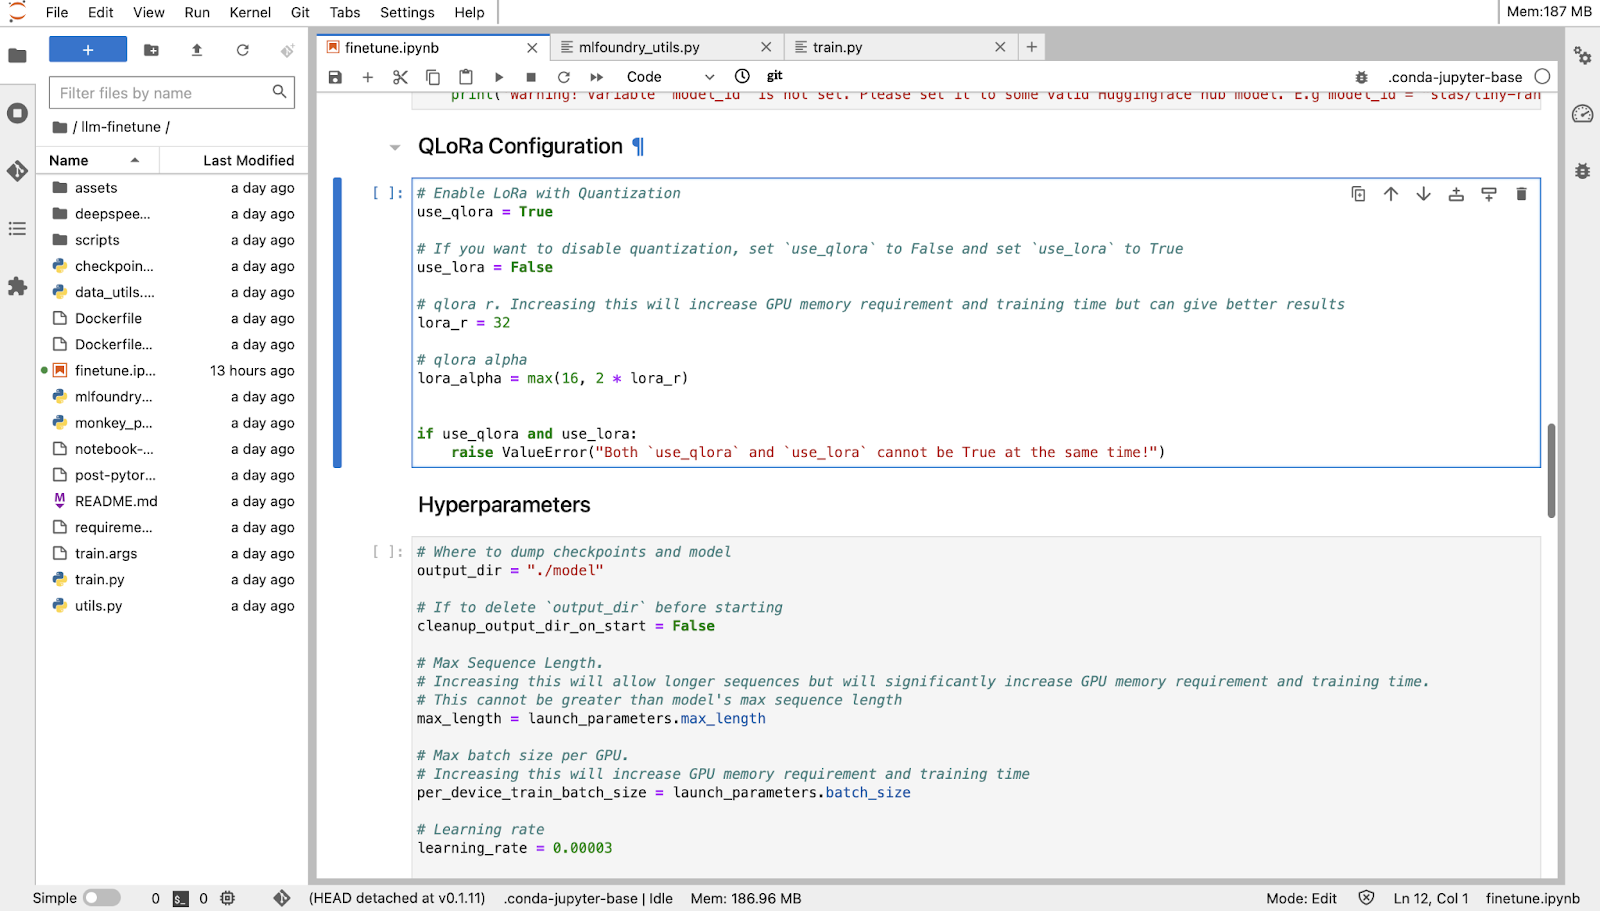
4. Fine-Tunning as Job:
Before you start, you will first need to create an ML Repo (this will be used to store your training metrics and artifacts, such as your checkpoints and models) and give your workspace access to the ML Repo. You can read more about ML Repo's in Truefoundry’s documentation.
Now you have to choose ‘Launch as Job’ and select default values of hyperparameters for initiating fine-tuning.
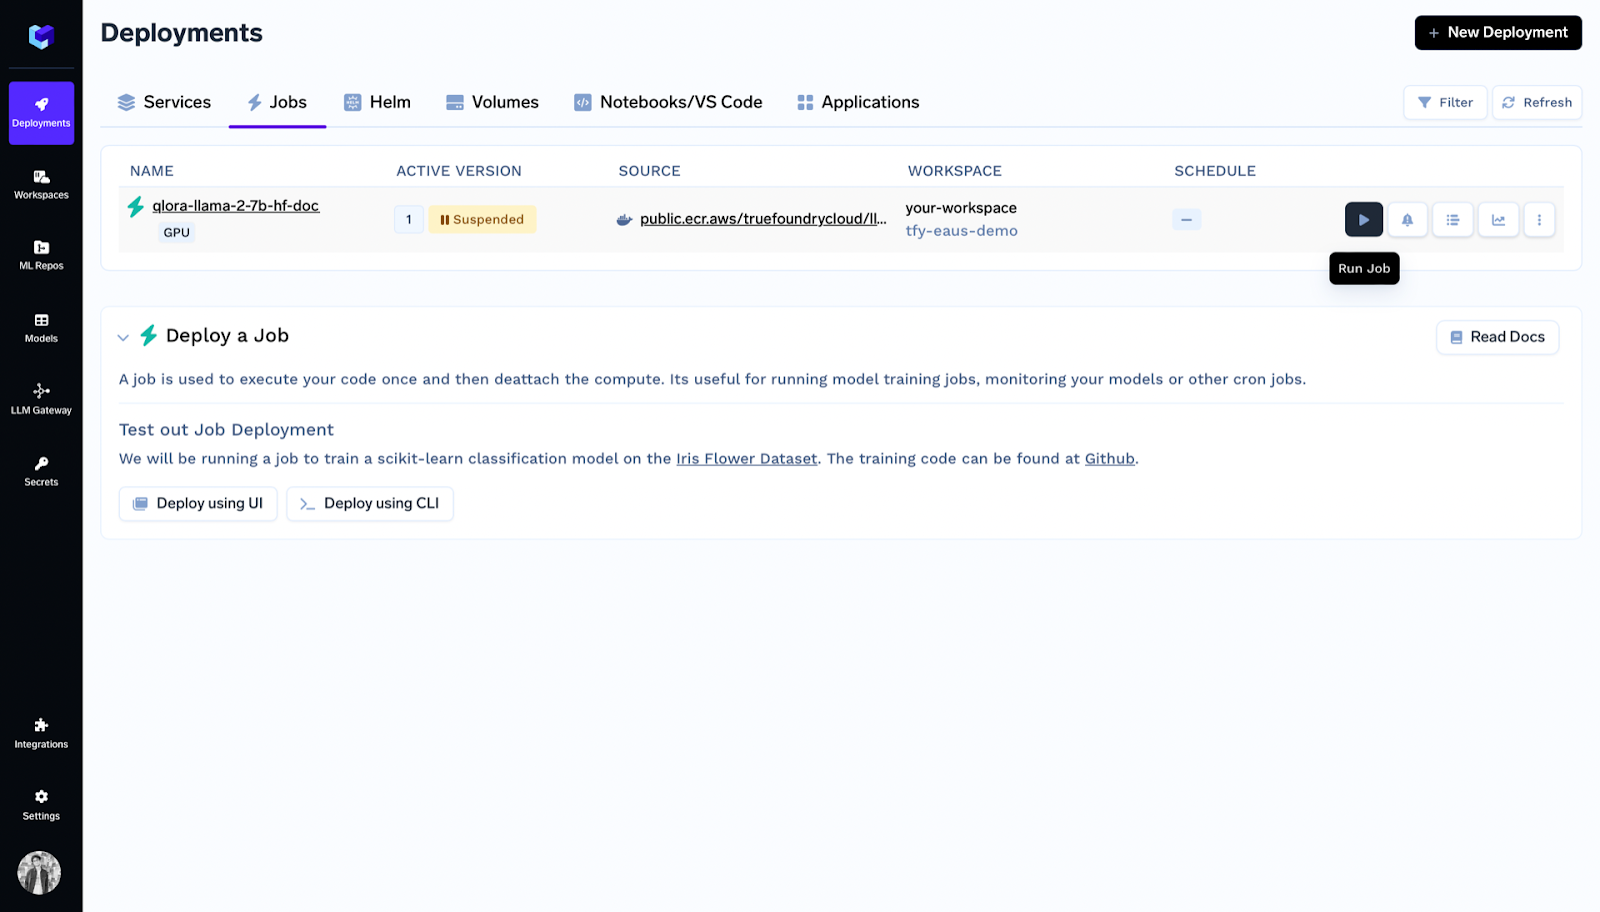
Inside deployments you can see the job listed and click on run job.
Key Features:
- Support for Popular LLMs: Allows fine-tuning of widely-used open-source LLMs like Llama 2, Mistral, Zephyr, and Mixtral.
- Flexibility in Fine-Tuning Approach: Offers the option to fine-tune LLMs using either Jobs for scalability and reliability or Notebooks for experimentation and iterative tuning.
- QLoRA Technique: Employs the QLoRA fine-tuning technique, which balances efficiency with performance, enabling fine-tuning on less powerful hardware without compromising quality.
- Data Format Support: Supports data in jsonl format, catering to both chat and completion type datasets, facilitating a range of LLM applications.
- Easy Data Integration: Offers options to upload training data as a TrueFoundry artifact, to cloud storage services, or locally, providing flexibility in data management.
- Deployment Support: Post fine-tuning, guides on deploying the fine-tuned model for practical application are available, enhancing the model’s utility.
- ML Repository Integration: Allows tracking of fine-tuning progress and managing training metrics/artifacts through ML Repositories, ensuring organized and accessible model development.
2. Open AI API
The OpenAI API provides access to advanced artificial intelligence models developed by OpenAI, including the latest versions of GPT (Generative Pre-trained Transformer). One of the standout features of the OpenAI API is its ability to fine-tune models on custom datasets.
Thus you can tailor the behavior of models like GPT-3 or newer versions to specific applications or to adhere to particular content styles and preferences.
Since I am referring to the API, it is not exactly ‘’No-Code’, still one can easily set it up for training as compared to other tools in the previous section.
Example Code for Fine-Tuning:
- Preparing Your Dataset
To fine-tune a model, you first need to prepare your dataset in a format that the OpenAI API can understand. Typically you would have to create a JSON file which looks like this:
- Uploading Your Dataset to OpenAI
You can easily upload the dataset using Open AI CLI (Command Line Interface).
openai tools fine_tunes.prepare_data -f your_dataset.jsonl
- Fine-Tuning the Model
Once your dataset is prepared and uploaded, you can initiate a fine-tuning process. The following is an example using OpenAI's Python library:
- Using Your Fine-Tuned Model
After the fine-tuning process is complete, you can use your fine-tuned model for generating text or other tasks by specifying the fine-tuned model's ID:
You can also deploy your fine-tuned model.
Key Features:
- Ease of Use: The API simplifies interactions with powerful AI models, removing the complexities of directly managing or training large neural networks.
- Scalability: OpenAI handles the infrastructure and scaling, providing consistent performance regardless of the workload.
- Continual Updates: OpenAI frequently updates its API and models, giving users access to the latest advancements in AI research.
3. Microsoft Azure
Microsoft Azure is a cloud computing platform offering a wide range of services, including computing, storage, analytics, and more. It provides users with the tools to build, deploy, and manage applications efficiently.
One notable feature is its intuitive interface, making it easy for beginners to navigate without extensive coding knowledge. With simple clicks rather than complex coding, users can fine-tune their applications, making Azure an accessible tool for stress-free development.
Here is simple walkthrough on how to set-up a fine-tuning ‘job’ in Azure:
- Preparing your data:
Obviously, this is the basic requirement for all tools. The training data can be in JSON Lines (JSONL), CSV, or TSV format. The requirements of your data vary based on the specific task you intend to fine-tune your model for.
For text classification:
Two columns: Sentence (string) and Label (integer/string)
- Choose a foundation model
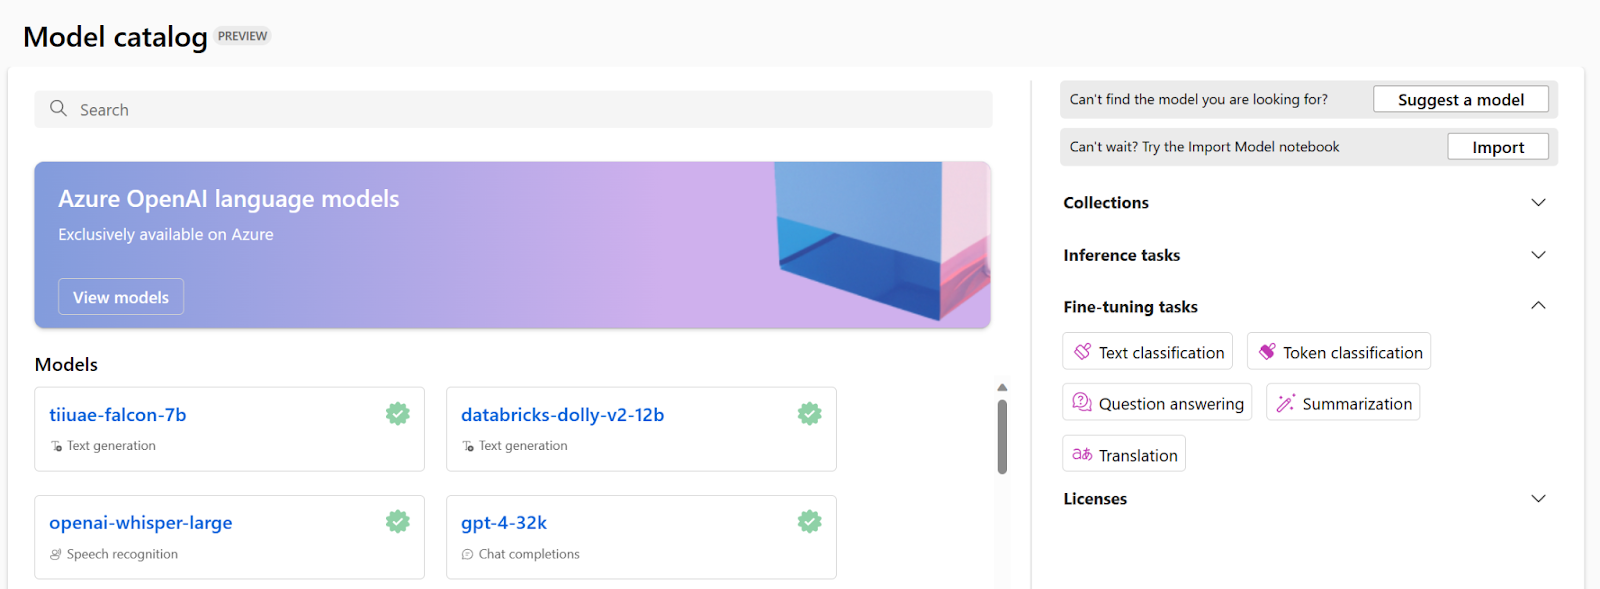
- Configure a fine-tuning job:
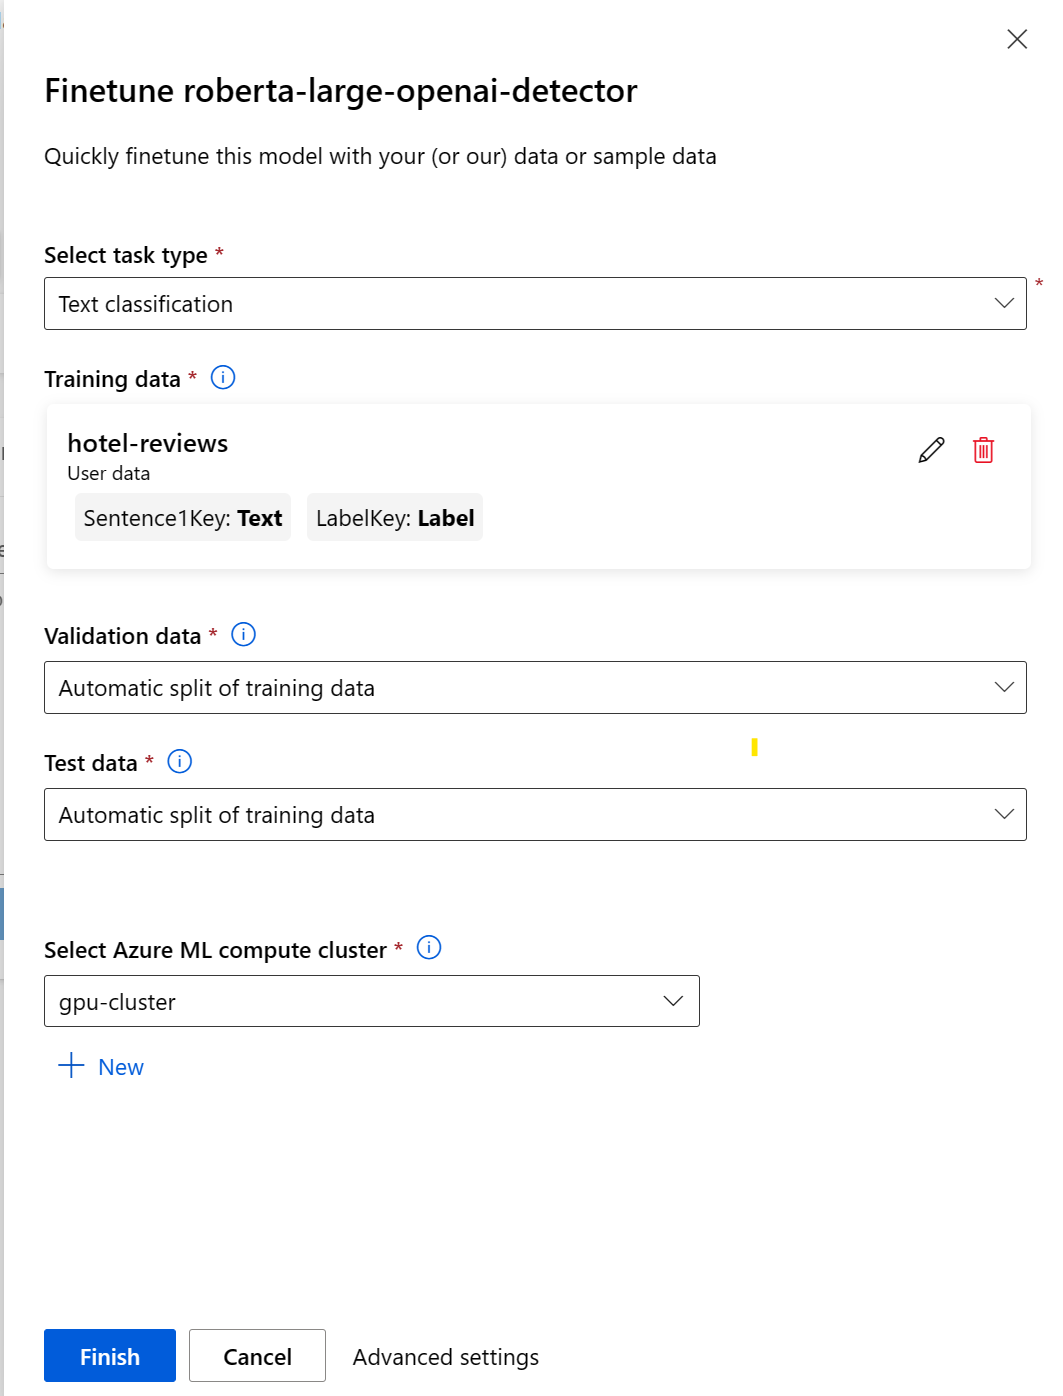
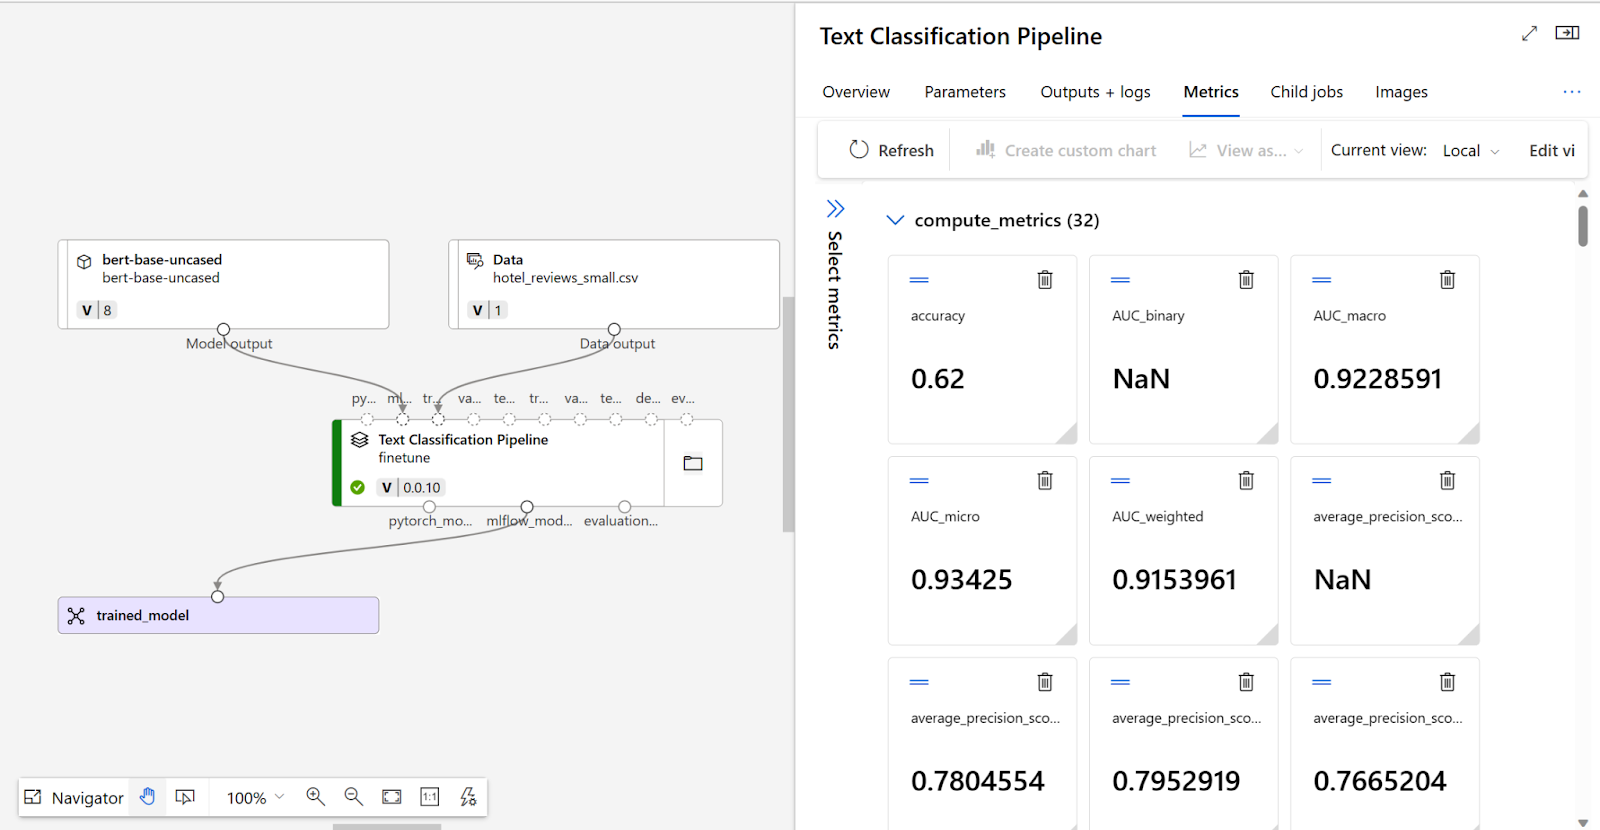
After you submit the fine-tuning job, a pipeline job will be created to train your model. You can review all inputs and collect the model from the job outputs.
- Evaluate your fine-tuned model
To decide whether your fine-tuned model performs as expected, you can review the training and evaluation metrics.
Key Features:
- User-Friendly Interface: Azure's easy-to-use interface simplifies navigation for beginners.
- No-Code Options: Fine-tuning doesn't require extensive coding; users can achieve tasks with simple clicks.
- Scalability: Applications can be easily scaled up or down to meet changing demands.
- Comprehensive Services: Azure offers a range of tools for fine-tuning, including analytics and monitoring features.
- Integration: Seamlessly integrates with Microsoft and third-party tools for flexibility in workflows.
4. Replicate
Replicate is a versatile tool designed for fine-tuning various aspects of software applications. Replicate's applications as a fine-tuning tool include optimizing performance, adjusting configurations, and enhancing functionality with minimal effort. It simplifies the process by handling GPU setup. Similar to Open AI API, it is not exactly ‘’No-Code’ like other tools in the list, still one can easily set it up for training as compared to other tools in the previous section.
Steps to Fine-Tunning llama-2b:
- Prepare Your Training Data
Your training data needs to be in a JSONL format. Below is an example of how you might structure this file:
- Authenticate with Replicate
You need to set your Replicate API token as an environment variable in your terminal:
export REPLICATE_API_TOKEN=<your-token-here>
- Upload Your Training Data
You can upload your data to an s3 bucket or directly at Replicate using curl commands:
- Create a Model on Replicate
You need to create an empty model on Replicate for your trained model. When your training finishes, it will be pushed as a new version to this model.
- Create a Training Job
You need to create a training Job on your IDE, as shown below:
- Monitor Training Progress
To monitor the progress programmatically, you can use:
- Run Your Fine-Tuned Model
After the training is complete, you can run your model with the API:
Key Features:
- Ease of Use: Simplifies the fine-tuning process with a user-friendly interface and straightforward API, making it accessible to both beginners and experienced practitioners.
- Cloud-Based Training: Removes the need for local GPU resources by offering cloud-based training, allowing users to train models regardless of their hardware.
- Flexible Data Input: Supports JSONL format for training data, allowing for flexible and structured input for a variety of tasks.
- Model Hosting: Automatically hosts fine-tuned models, enabling easy integration and deployment of AI models into applications.
- Version Control: Keeps track of different training versions, making it easy to manage, compare, and revert to previous versions of a model.
5. Google Gen AI Studio
At Gen AI Studio, you have both options for setting up fine-tuning jobs, through API or the website, here I will talk about only the API method. It has the most streamlined process as compared to the tools discussed above.
Here's a step-by-step guide:
- Prepare Your Dataset
Your dataset should be in JSONL format, with each line being a JSON object with "input_text" and "output_text" keys. It can start training with only 10 examples but at least 100 examples are recommended.
- Upload Your Dataset
You must upload your dataset to Google Cloud Storage (GCS) bucket, if you don’t have one you can create one in Google Drive.
- Authentication and Initialization
Now you have to provide your credentials to establish the connection:
- Prepare the Tuning Function
You need to define a function for tuning with the necessary parameters.
- Execute Model Tuning
Call the tuning function specified earlier, with your specific parameters. The training_data parameter can be a GCS URI or a pandas DataFrame.
Key Features:
- Provision for both API Access and User Interface: For those who prefer a graphical approach, Gen AI Studio offers an intuitive user interface.
- Scalable Infrastructure: Leverage Google Cloud's scalable infrastructure to handle large datasets and compute-intensive tuning jobs efficiently.
- Integration with Google Cloud Services: Seamless integration with other Google Cloud services, such as Cloud Storage for dataset management and Vertex AI for deploying models.
- Wide Range of Pre-Trained Models: Access a variety of pre-trained models suitable for different tasks and languages, offering a solid starting point for fine-tuning.
- Collaboration and Version Control: Facilities to collaborate with team members, share fine-tuning projects, and maintain version control over fine-tuned models.
6. Predibase
Predibase is a specialized platform designed to facilitate the fine-tuning of large language models (LLMs), such as GPT-4, for specific tasks or applications. It provides access to the advanced capabilities of LLMs by providing a streamlined, user-friendly environment for customizing these models according to individual needs.
Predibase gives you the option of both Python SDK and UI for performing fine-tuning jobs.
Here's a step-by-step guide to fine-tune mistral-7b-instruct:
- Basic Setup
First, sign up for an account on Predibase and deposit to add credits. Afterwards, generate your API Key.
- Creating Model Repository
Go to Models and then click on “New Model Repository” as shown below:
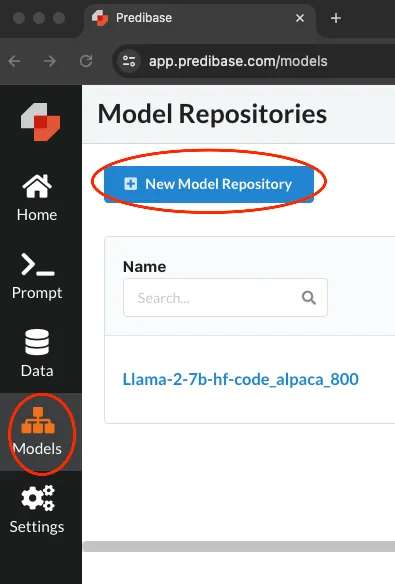
Now, name your repository and add a description.
- Start Fine-Tunning:
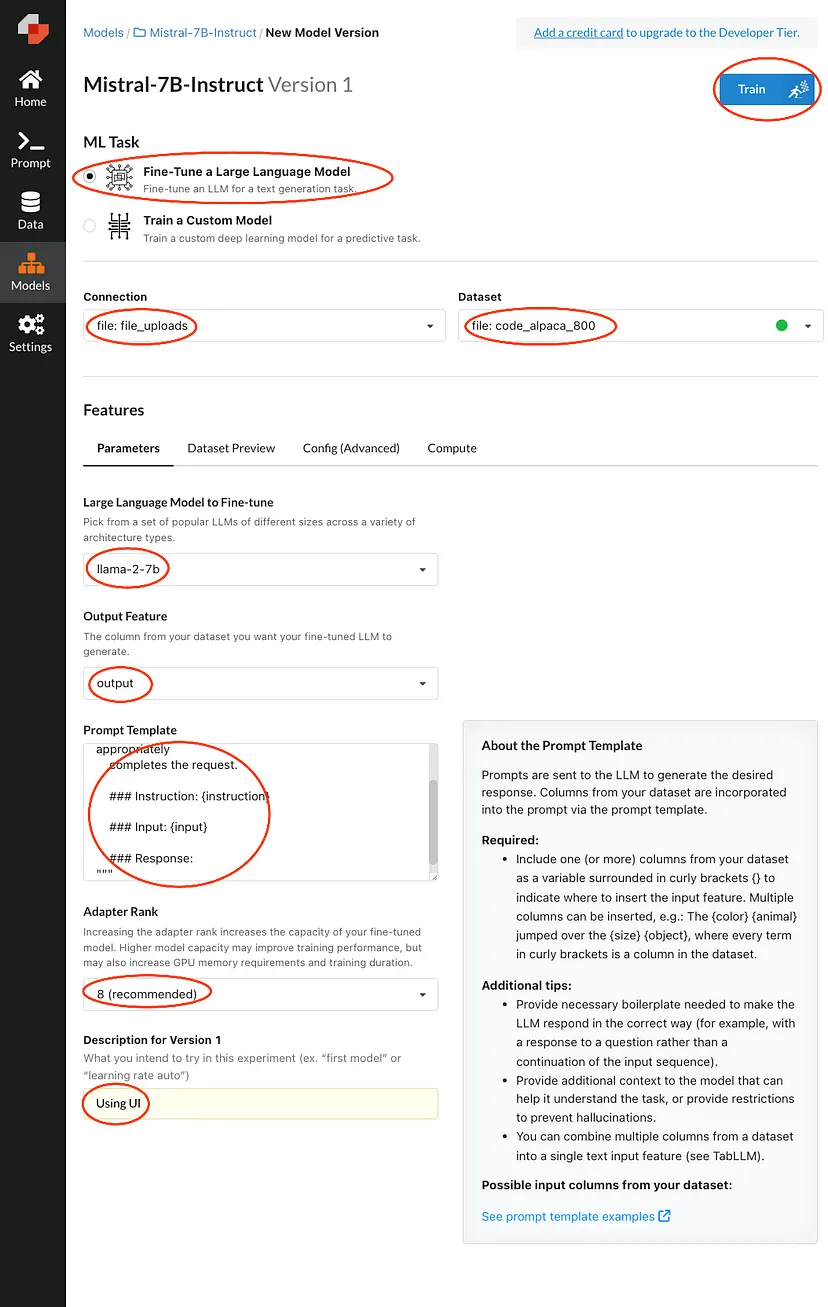
Fill in the areas highlighted and then press train. This will queue your request until there's an available compute.
Code Platforms:
Code Platforms are designed for users with a solid background in programming. These platforms provide virtual machines that allow for the running of custom Python scripts for tasks such as fine-tuning. These platforms are perfect for projects that demand high customization and intricate control over the training and deployment phases.
1. Amazon Sagemaker:
Amazon SageMaker is a fully managed service that provides developers and data scientists with the ability to build, train, and deploy machine learning models quickly.
Amazon SageMaker doesn't have a dedicated, built-in "fine-tuning" feature specifically labelled as such for large language models. Instead, it provides a powerful and flexible platform that allows you to run custom Python scripts to accomplish fine-tuning tasks.
Here's a simple example of how you might start a fine-tuning job for a language model with Hugging Face on SageMaker. This assumes you have already set up an AWS account and configured the AWS CLI. (you can use TensorFlow or PyTorch directly on Amazon SageMaker for fine-tuning tasks)
- Setup and Initialize SageMaker Session:
- Prepare the Fine-Tuning Script:
You'd typically write a fine-tuning script (train.py) that you pass to the estimator. This script should include your model loading, fine-tuning, and saving logic.
- Create a Hugging Face Estimator:
- Start the Training Job:
Key Features:
- Pre-built algorithms and support for popular frameworks: SageMaker supports TensorFlow, PyTorch, Hugging Face, and others, making it easier to fine-tune LLMs on custom datasets.
- Managed Spot Training: It reduces the cost of training models by using Amazon EC2 Spot Instances.
- Distributed Training: SageMaker makes it simpler to train models faster and more cost-effectively by distributing the training job across multiple GPUs or instances.
2. Google Colab:
Google Colab is a popular cloud-based Jupyter notebook service that offers free access to computing resources, including GPUs and TPUs, making it an excellent platform for fine-tuning large language models (LLMs)
It is particularly beginner-friendly. Colab notebooks run in the cloud, directly from your browser, without requiring any local setup.
Here is the simple code snippet for fine-tuning a Transformer Model with Hugging Face Transformers and PyTorch in Google Colab
- Setting Up the Environment:
!pip install torch torchvision transformers
- Loading a Pre-trained Model and Tokenizer:
- Fine-Tuning the Model: (assuming you have a dataset loaded into variables input_ids, attention_masks, and labels)
- Saving the Model:
model.save_pretrained("/content/drive/My Drive/Colab Models/my_finetuned_model")
Key Features:
- Free Access to GPUs/TPUs: Colab provides free access to NVIDIA GPUs and Google TPUs, which can significantly speed up the training and fine-tuning of machine-learning models.
- Integration with Google Drive: Easily store and access your datasets and models directly from Google Drive, facilitating seamless data handling and model saving.
- Pre-installed Libraries: Colab comes with most of the data science and machine learning libraries pre-installed, including TensorFlow, PyTorch, Hugging Face Transformers, and many others, making it easy to start fine-tuning models right away.
- Interactive Environment: The notebook interface allows for interactive development and documentation, combining live code, visualizations, and text annotations.
3. Paperspace Gradient
Paperspace Gradient is a suite of tools designed to simplify the process of developing, training, and deploying machine learning models in the cloud.
Gradient is particularly effective for tasks like fine-tuning large language models (LLMs) due to its scalable infrastructure and support for containers, making it a strong choice for data scientists and ML practitioners.
Here is an example of fine-tuning a Transformer Model with PyTorch on Paperspace Gradient.
- Loading a Pre-trained Model and Tokenizer:
- Preparing the Dataset:
- Fine-Tuning the Model:
- Saving the Model:
model.save_pretrained("./my_finetuned_model")
Key Features:
- Pre-configured Environments: Gradient offers pre-configured environments for TensorFlow, PyTorch, Hugging Face, and other machine learning frameworks, enabling quick setup for fine-tuning tasks.
- Powerful GPUs: Access to a wide range of GPU options ensures you can scale your computing power according to your project's needs, from more cost-effective options for initial experiments to high-end GPUs for intensive training sessions.
- Gradient Notebooks: An interactive coding environment similar to Jupyter Notebooks, but with the added benefit of running on Paperspace's cloud infrastructure. This is ideal for developing, fine-tuning, and experimenting directly in the cloud.
- Jobs and Workflows: Automate your machine learning pipelines by running jobs in sequence or in parallel, enabling efficient model training and deployment.
4. Run.ai
Run.AI is a platform designed to optimize GPU resources for machine learning workloads, making it easier for data scientists and AI researchers to run and manage complex AI models, including fine-tuning large language models (LLMs).
It's based on Kubernetes, a tool that organizes computer resources efficiently. So, it makes running complex AI projects easier and lets teams grow their projects smoothly.
You can refer to Run.AI documentation for detailed insights, here’s a simplified example based on the general workflow for fine-tuning a model like LLaMA-2 on the Run.AI platform.
- Preparing Your Environment
- Setting Up Your Project and GPU Requests
runai submit my-fine-tuning-job -p my-project --gpu 2 --image my-llama2-fine-tuning-image train.py
- Writing the Fine-Tuning Script
Your train.py script should include the logic for loading LLaMA-2 (or your chosen model), your dataset, and executing the fine-tuning process. This might involve using libraries such as Hugging Face Transformers for model loading and TensorFlow or PyTorch for the training loop.
from transformers import LlamaForConditionalGeneration, LlamaTokenizer
- Monitoring and Managing the Training Job
Run.AI provides tools to monitor the GPU usage, and progress of your training jobs, and manage computational resources effectively. Use the Run.AI dashboard or CLI to keep track of your job's status and performance.
runai list jobs
This command lists all the current jobs, allowing you to monitor the progress and resource usage of your fine-tuning task.
Key Features:
- GPU Optimization and Elastic GPU Allocation: Automatically optimizes GPU usage, improves efficiency and dynamically allocates GPU resources based on workload demands, thus significantly reducing costs.
- Simplified Resource Management: Offers an intuitive dashboard and CLI for managing AI workloads, making it easy to monitor and adjust resource usage in real time.
- Integration with Popular Frameworks: Supports popular machine learning frameworks such as TensorFlow, PyTorch, and Hugging Face Transformers, facilitating seamless integration into existing workflows.
Choosing Right Tool for you:
Ease of Use: Pick tools that are straightforward, especially if you're not big on coding. Some tools don't even require you to write code!
Scalability: Ensure the tool can grow with your project, handling larger datasets and more complex models smoothly.
Model and Dataset Support: Choose tools that work well with the specific types of data and models you're using.
Computational Resources: Look for access to GPUs or TPUs if your project needs heavy computing power.
Cost: Consider how much you're willing to spend. Some tools are free; others charge based on the resources you use.
Customizability and Control: If you know your way around code, you might prefer tools that let you tweak everything.
Integration: It's easier if the tool fits seamlessly into your existing workflow and tools.
Community and Support: A supportive community and good documentation can save you a lot of headaches.
Built for Speed: ~10ms Latency, Even Under Load
Blazingly fast way to build, track and deploy your models!
- Handles 350+ RPS on just 1 vCPU — no tuning needed
- Production-ready with full enterprise support
TrueFoundry AI Gateway delivers ~3–4 ms latency, handles 350+ RPS on 1 vCPU, scales horizontally with ease, and is production-ready, while LiteLLM suffers from high latency, struggles beyond moderate RPS, lacks built-in scaling, and is best for light or prototype workloads.


.png)


%20(11).png)

