Requirements:
The requirements to setup compute plane in existing cluster is as follows:- K8s version 1.28 or higher with ability to run 250 nodes and 4096 pods with GPU and CPU depending on your use case.
- Egress access to container registries -
public.ecr.aws,quay.io,ghcr.io,tfy.jfrog.io,docker.io/natsio,nvcr.io,registry.k8s.ioso that we can download the docker images for argocd, nats, gpu operator, argo rollouts, argo workflows, istio, keda, etc. - We need a domain to map to the service endpoints and certificate to encrypt the traffic. A wildcard domain like *.services.example.com is preferred. TrueFoundry can do path based routing like
services.example.com/tfy/*, however, many frontend applications do not support this. For certificate, check this document for more details. - Support for block storage for disk volumes and NFS storage for artifact storage.
- A bucket and container registry will be required for the cluster.
- An IP pool is required for the load balancer to get an IP address. Check metallb for more details.
Setting up compute plane
TrueFoundry compute plane infrastructure, for generic cluster, is provisioned using helm. You can download the helm commands and execute them on your cluster.Choose an existing cluster
Go to the platform section in the left panel and click on 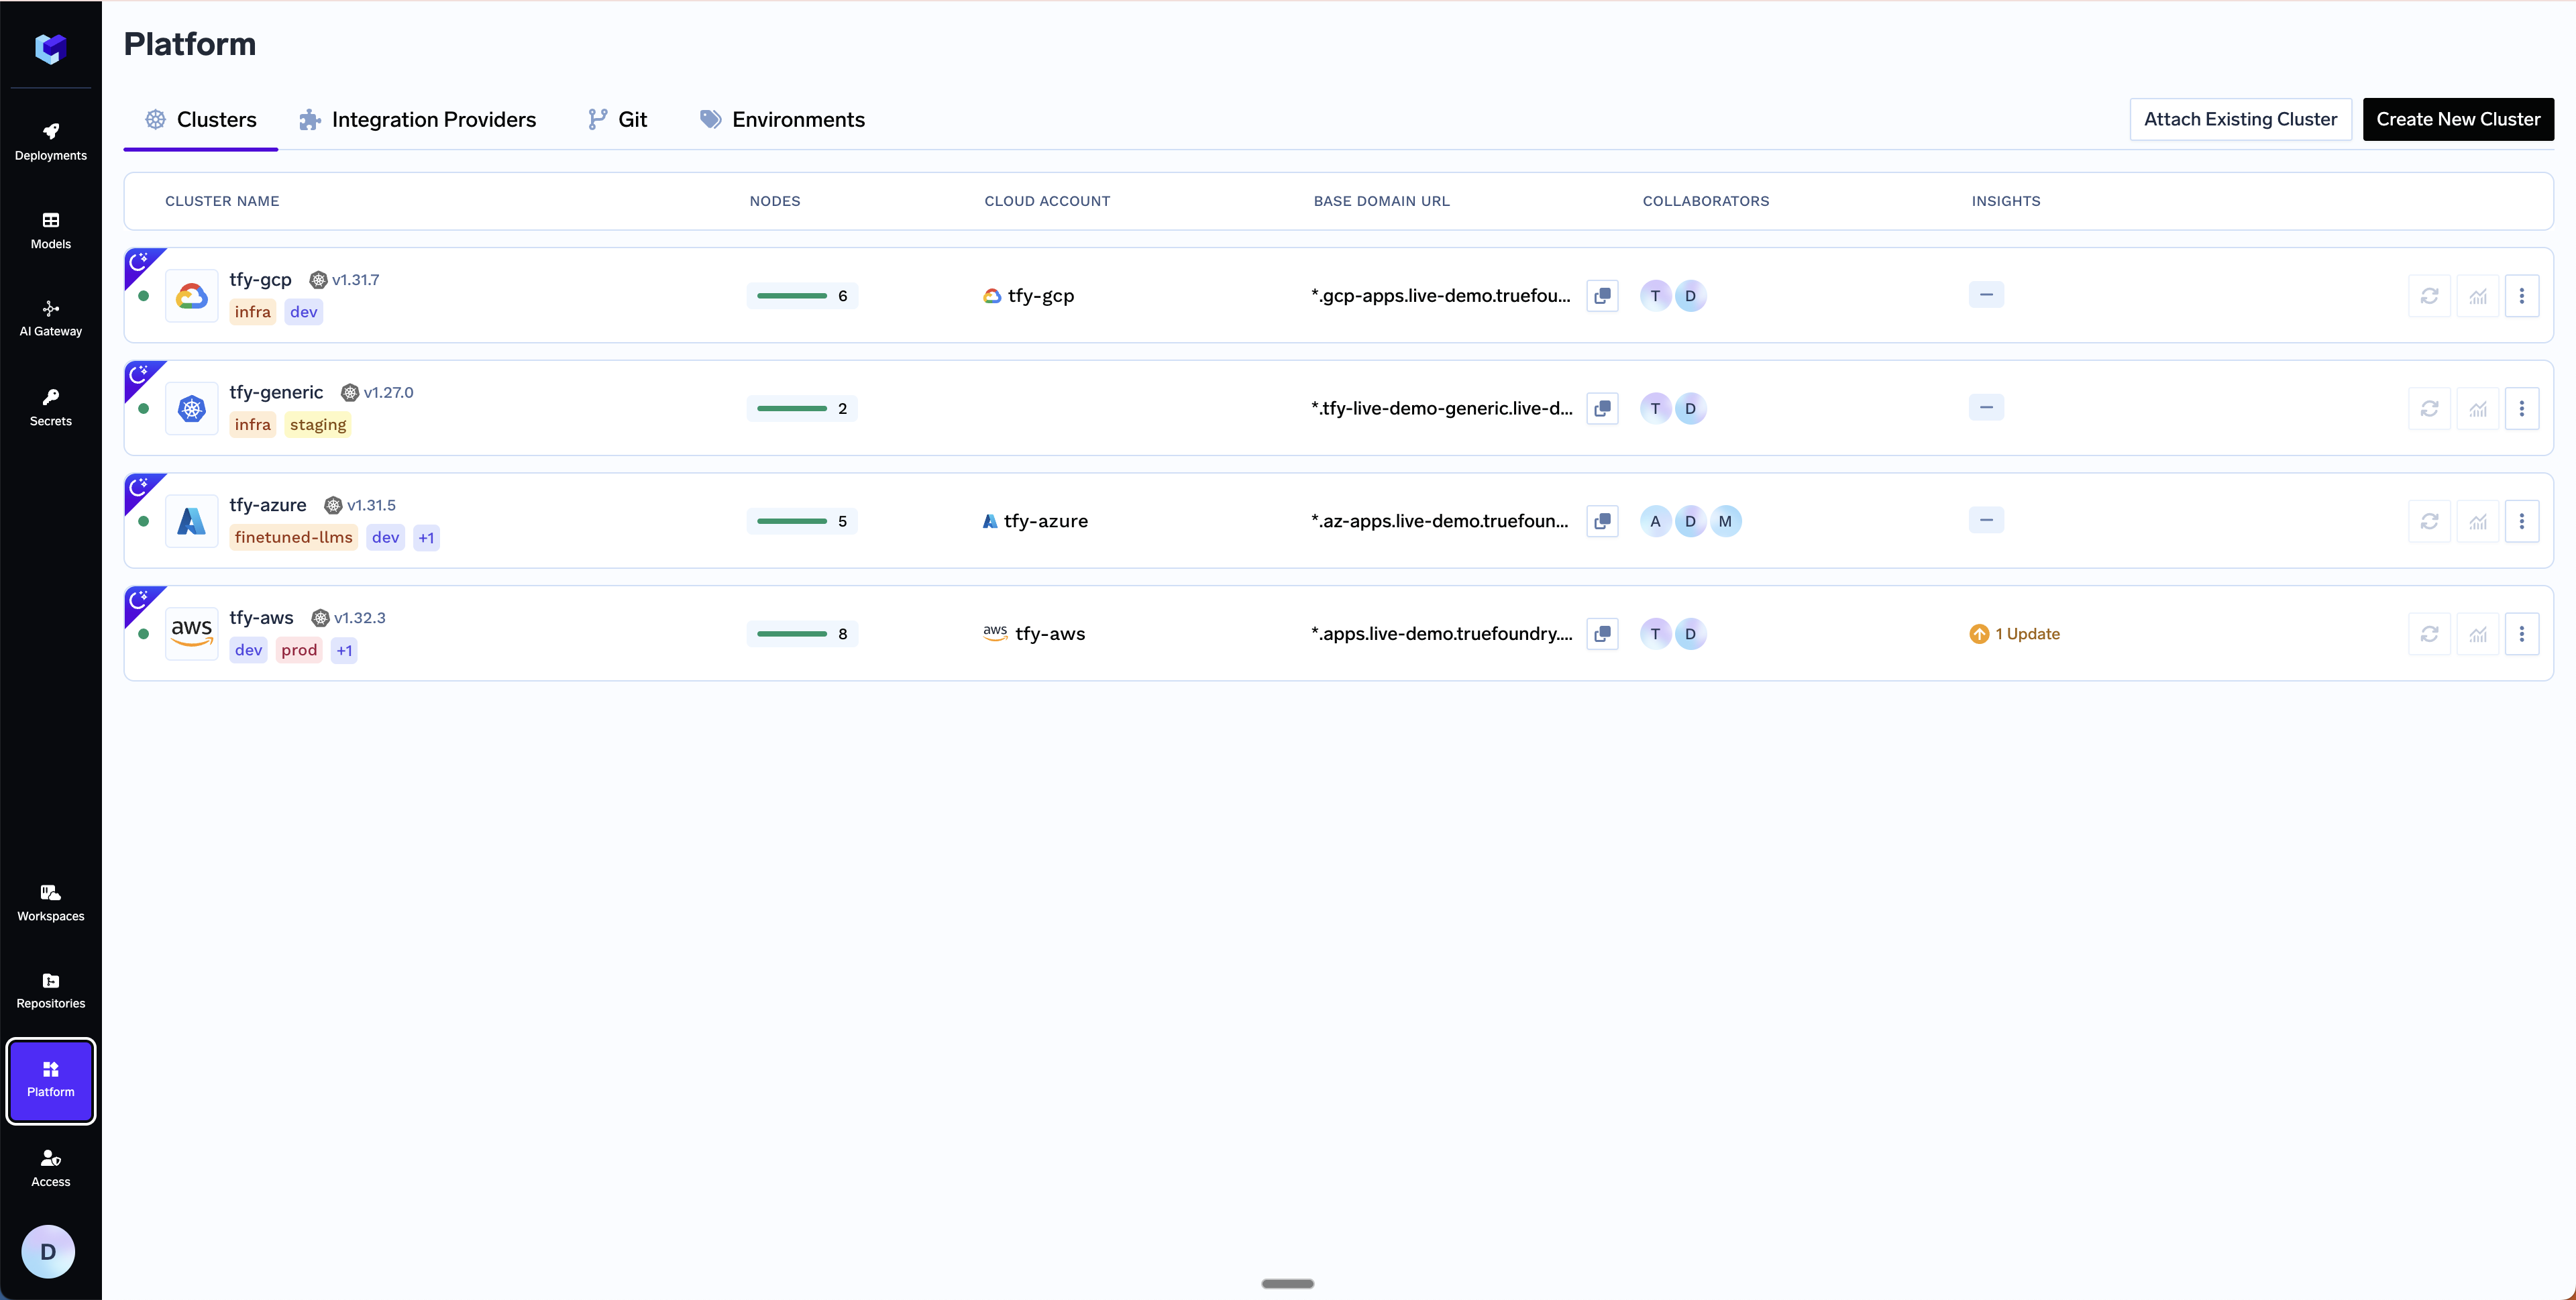
Clusters. You can click on Attach Existing Cluster . Read the requirements and if everything is satisfied, click on Continue.Fill up the form to generate the helm commands
A form will be presented with the details for the new cluster to be created. Fill in with your cluster details. Click
Submit when done- Attach Existing Cluster
The key fields to fill up here are:
Cluster Name- Your cluster name.Cluster Addons- TrueFoundry needs to install addons like ArgoCD, ArgoWorkflows, Keda, Istio, etc. Please disable the addons that are already installed on your cluster so that truefoundry installation does not overrride the existing configuration and affect your existing workloads.
Copy the helm command and execute it on your cluster
You will be presented with 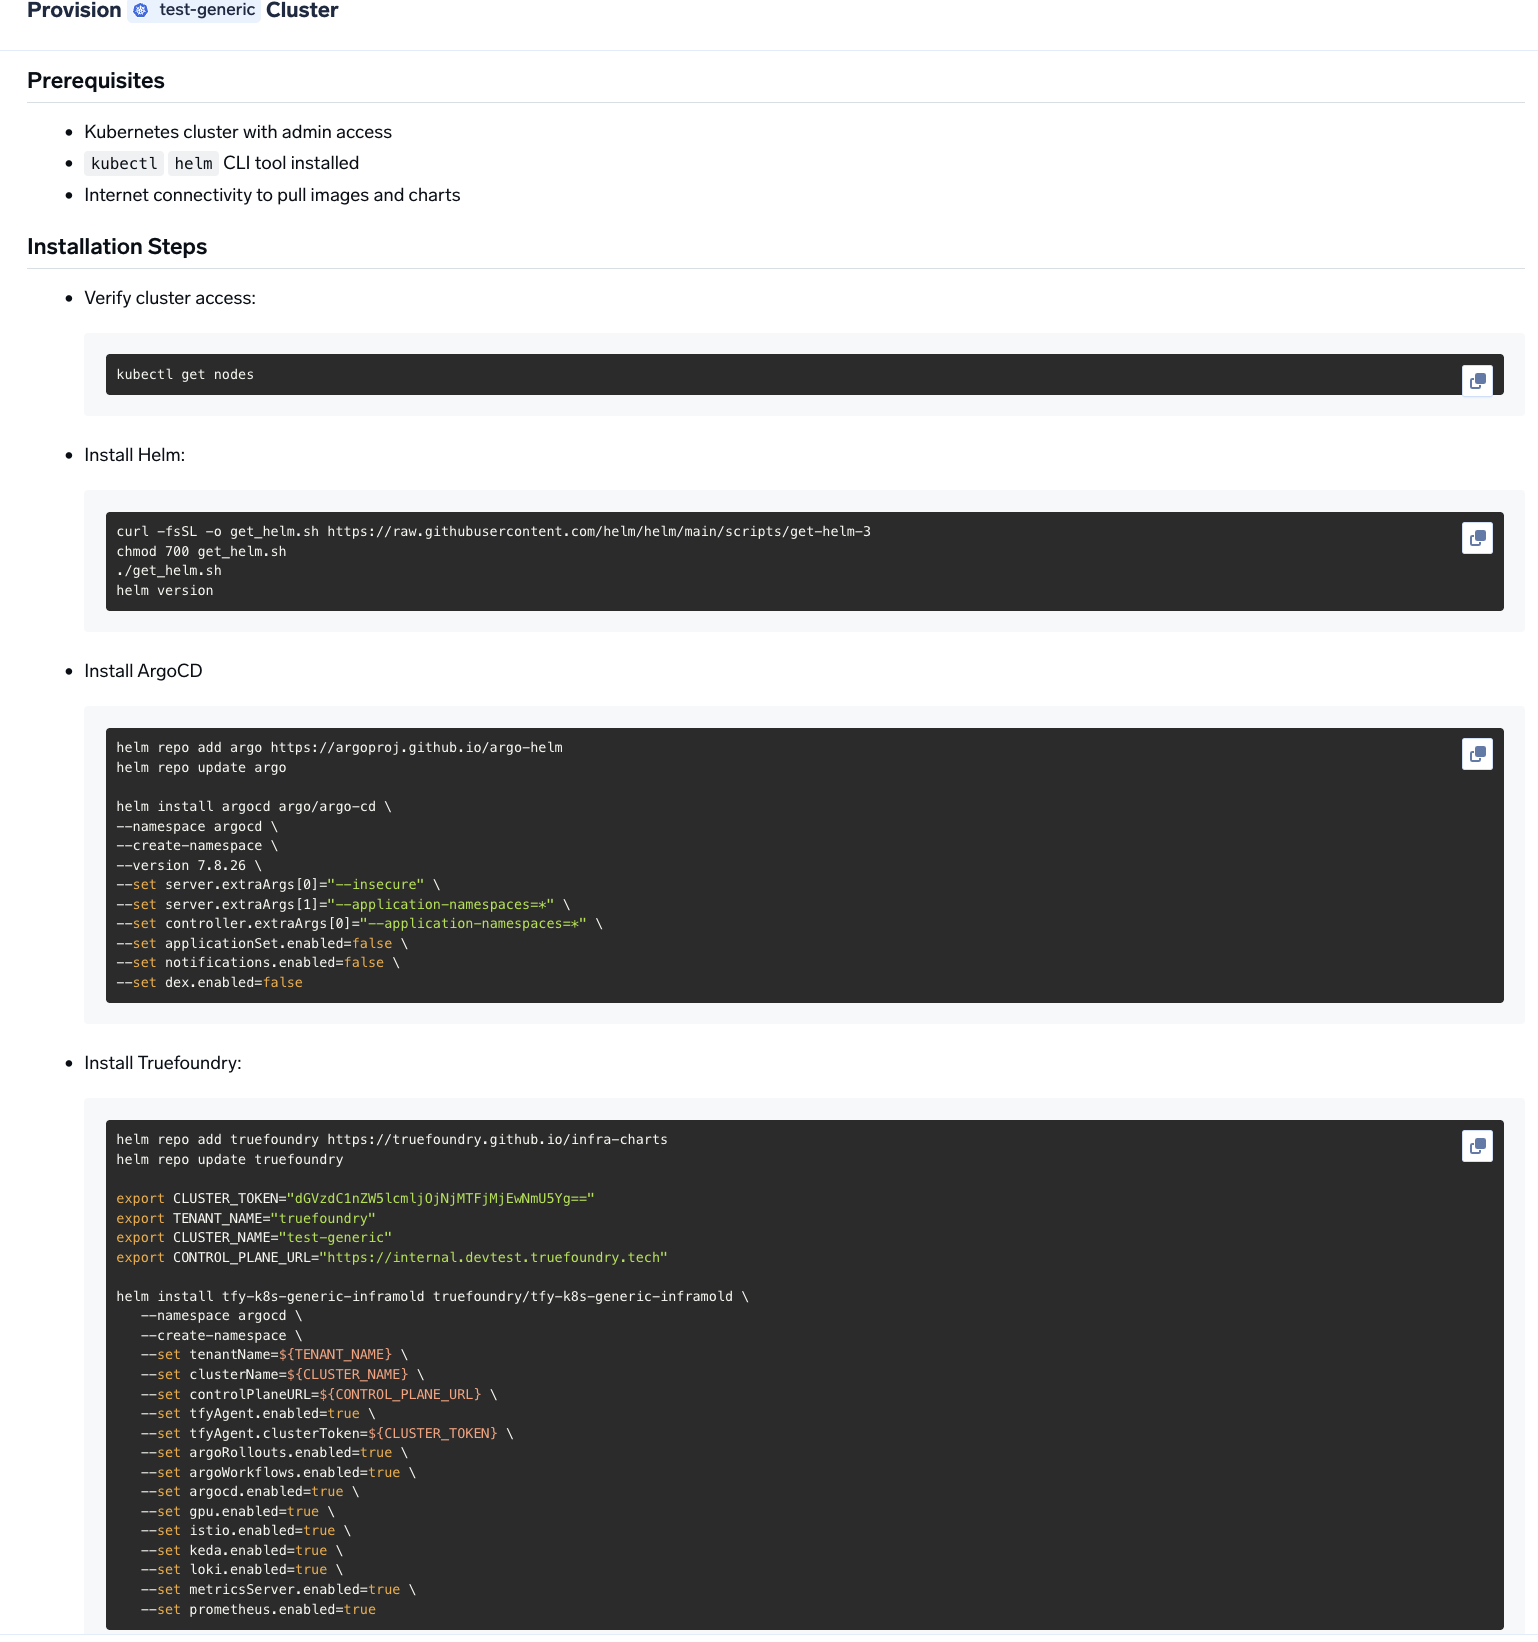
helm commands to install the TrueFoundry compute plane.Verify the cluster is showing as connected in the platform
Once the helm commands are executed, the cluster will be shown as connected in the platform.
Create DNS Record
We can get the load-balancer’s IP address by going to the platform section in the bottom left panel under the Clusters section. Under the preferred cluster, you’ll see the load balancer IP address under the 
Base Domain URL section.| Record Type | Record Name | Record value |
|---|---|---|
| CNAME | *.tfy.example.com | LOADBALANCER_IP_ADDRESS |
Setup routing and TLS for deploying workloads to your cluster
Follow the instructions here to setup DNS and TLS for deploying workloads to your cluster.
Configure Node Pools
On managed Kubernetes (EKS, GKE, AKS), TrueFoundry automatically discovers node pools. For generic or on-prem clusters, you need to label your nodes so TrueFoundry can identify and group them into node pools.1. Add a node pool label to every nodePick a label key (e.g. Then tell TrueFoundry which label key to look for:Supported
truefoundry.com/nodepool) and apply it to each node with the pool name as the value:- Go to Clusters in the platform, click Edit on your cluster.
- Toggle on Advanced Fields.
- Under Node Label Keys, set the Nodepool Selector Label to your chosen key (e.g.
truefoundry.com/nodepool).
GPU_TYPE values: A10G, A10_12GB, A10_24GB, A10_4GB, A10_8GB, A100_40GB, A100_80GB, H100_80GB, H100_94GB, H200, L4, L40S, P100, P4, T4, V100.Start deploying workloads to your cluster
You can start by going here
Setting up TLS in Generic Cluster
There are two primary ways to add TLS to the load balancer in a generic cluster.Can I use cert-manager to set up TLS in a generic cluster?
Can I use cert-manager to set up TLS in a generic cluster?
Yes. We recommend using cert-manager with Let’s Encrypt if you have a DNS provider.
Can I use my own certificate and key files to add TLS to the load balancer?
Can I use my own certificate and key files to add TLS to the load balancer?
If you have your own certificate files (for example, from another certificate provider or self-signed), you can use them directly with TrueFoundry.
-
Create a Kubernetes secret with your certificate and key, or create a self-signed certificate:
-
Once the secret is created, head over to the cluster page and navigate to the
tfy-istio-ingressadd-on. Add the secret name in thetfyGateway.spec.servers[1].tls.credentialNamesection and ensure thattfyGateway.spec.servers[1].port.protocolis set toHTTPS. Here we are usingexample-com-tlsas the secret name, which contains the certificate and key.