npx) or Python packages (via uvx) and are commonly used in development environments like VSCode, Cursor, or Claude Desktop. This guide shows you how to take an MCP server that you’re running locally and deploy it as a service on TrueFoundry.
This approach is ideal when you have instructions for using an MCP server in VSCode/Cursor/Claude and want to make it available as a service that can be accessed by the AI Gateway or other applications.
Common Scenario
You might have instructions like this for using an MCP server locally: For npm packages:Prerequisites
If you’re new to deploying services on TrueFoundry, we recommend first going through the Deploy Your First Service guide to understand the basic deployment workflow.
- An MCP server package name (e.g.,
@notionhq/notion-mcp-serverormcp-server-filesystem) - A TrueFoundry workspace (Create workspace if you don’t have one)
- The environment variables or configuration the MCP server requires
- Understanding of whether the package is npm-based (
npx) or Python-based (uvx)
Understanding the Deployment
MCP servers run vianpx or uvx typically use stdio (standard input/output) communication. To deploy them on TrueFoundry, you need to:
- Wrap the
npx/uvxcommand withmcp-proxyto convert stdio to HTTP - Deploy it as a service that can be accessed over HTTP
- Configure the necessary environment variables
Deployment Steps
Navigate to Service Deployment
- Log in to your TrueFoundry dashboard
- Select your workspace
- Navigate to Deployments → New Deployment → Service
Choose Deployment Method
- For npm packages (npx): You’ll deploy using Deploy from Docker Image with
node:24as the base image and run the command directly. - For Python packages (uvx): You’ll deploy using Deploy from Docker Image with
public.ecr.aws/docker/library/python:3.11-slimas the base image and installmcp-proxyvia pip in the command.
Configure Deployment
- npm Package (npx)
- Python Package (uvx)
- In TrueFoundry dashboard, select Deploy from Docker Image
- Set Docker Image to
node:24 - Set Command to
npx -y mcp-proxy --port 8000 --host 0.0.0.0 --server stream npx -y <package-name>- Replace
<package-name>with your actual package name - Add any required arguments after the package name
- Replace
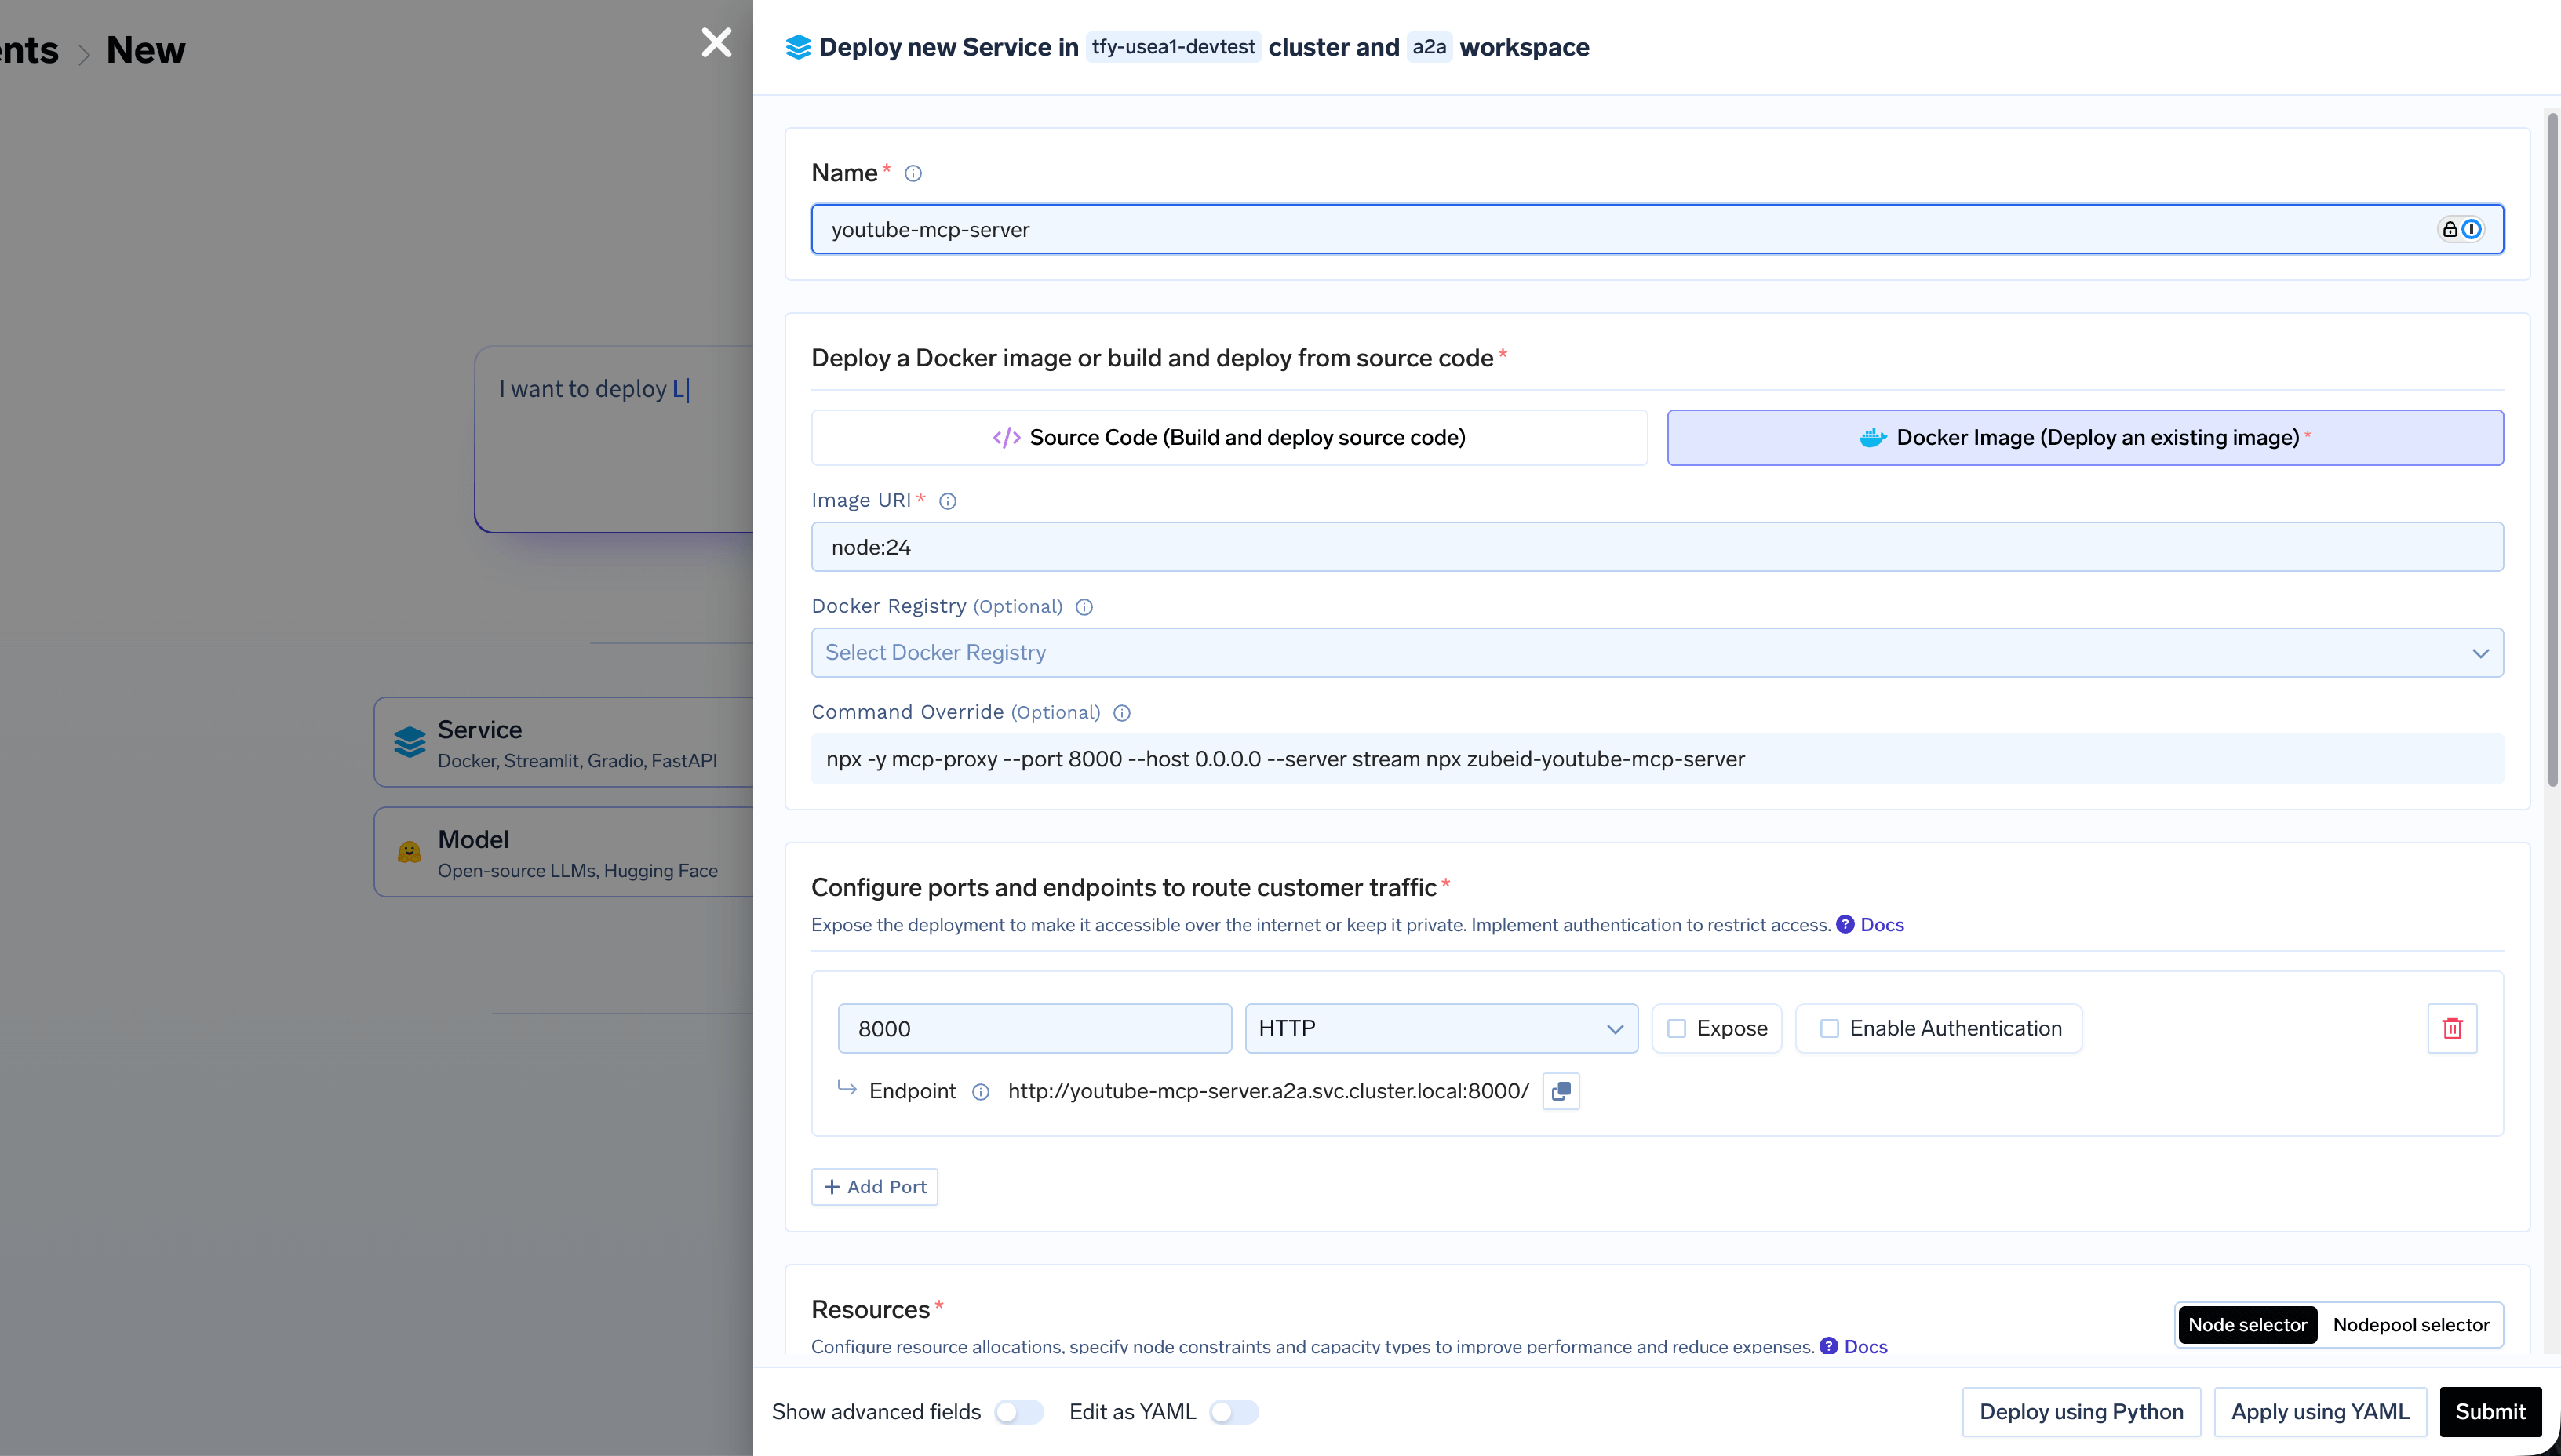
The
-y flag with npx automatically installs the package if it’s not already present. The first npx -y mcp-proxy installs and runs mcp-proxy, while the second npx -y <package-name> runs your MCP server package.- Command:
npx -y mcp-proxy --port 8000 --host 0.0.0.0 --server stream npx -y @notionhq/notion-mcp-server
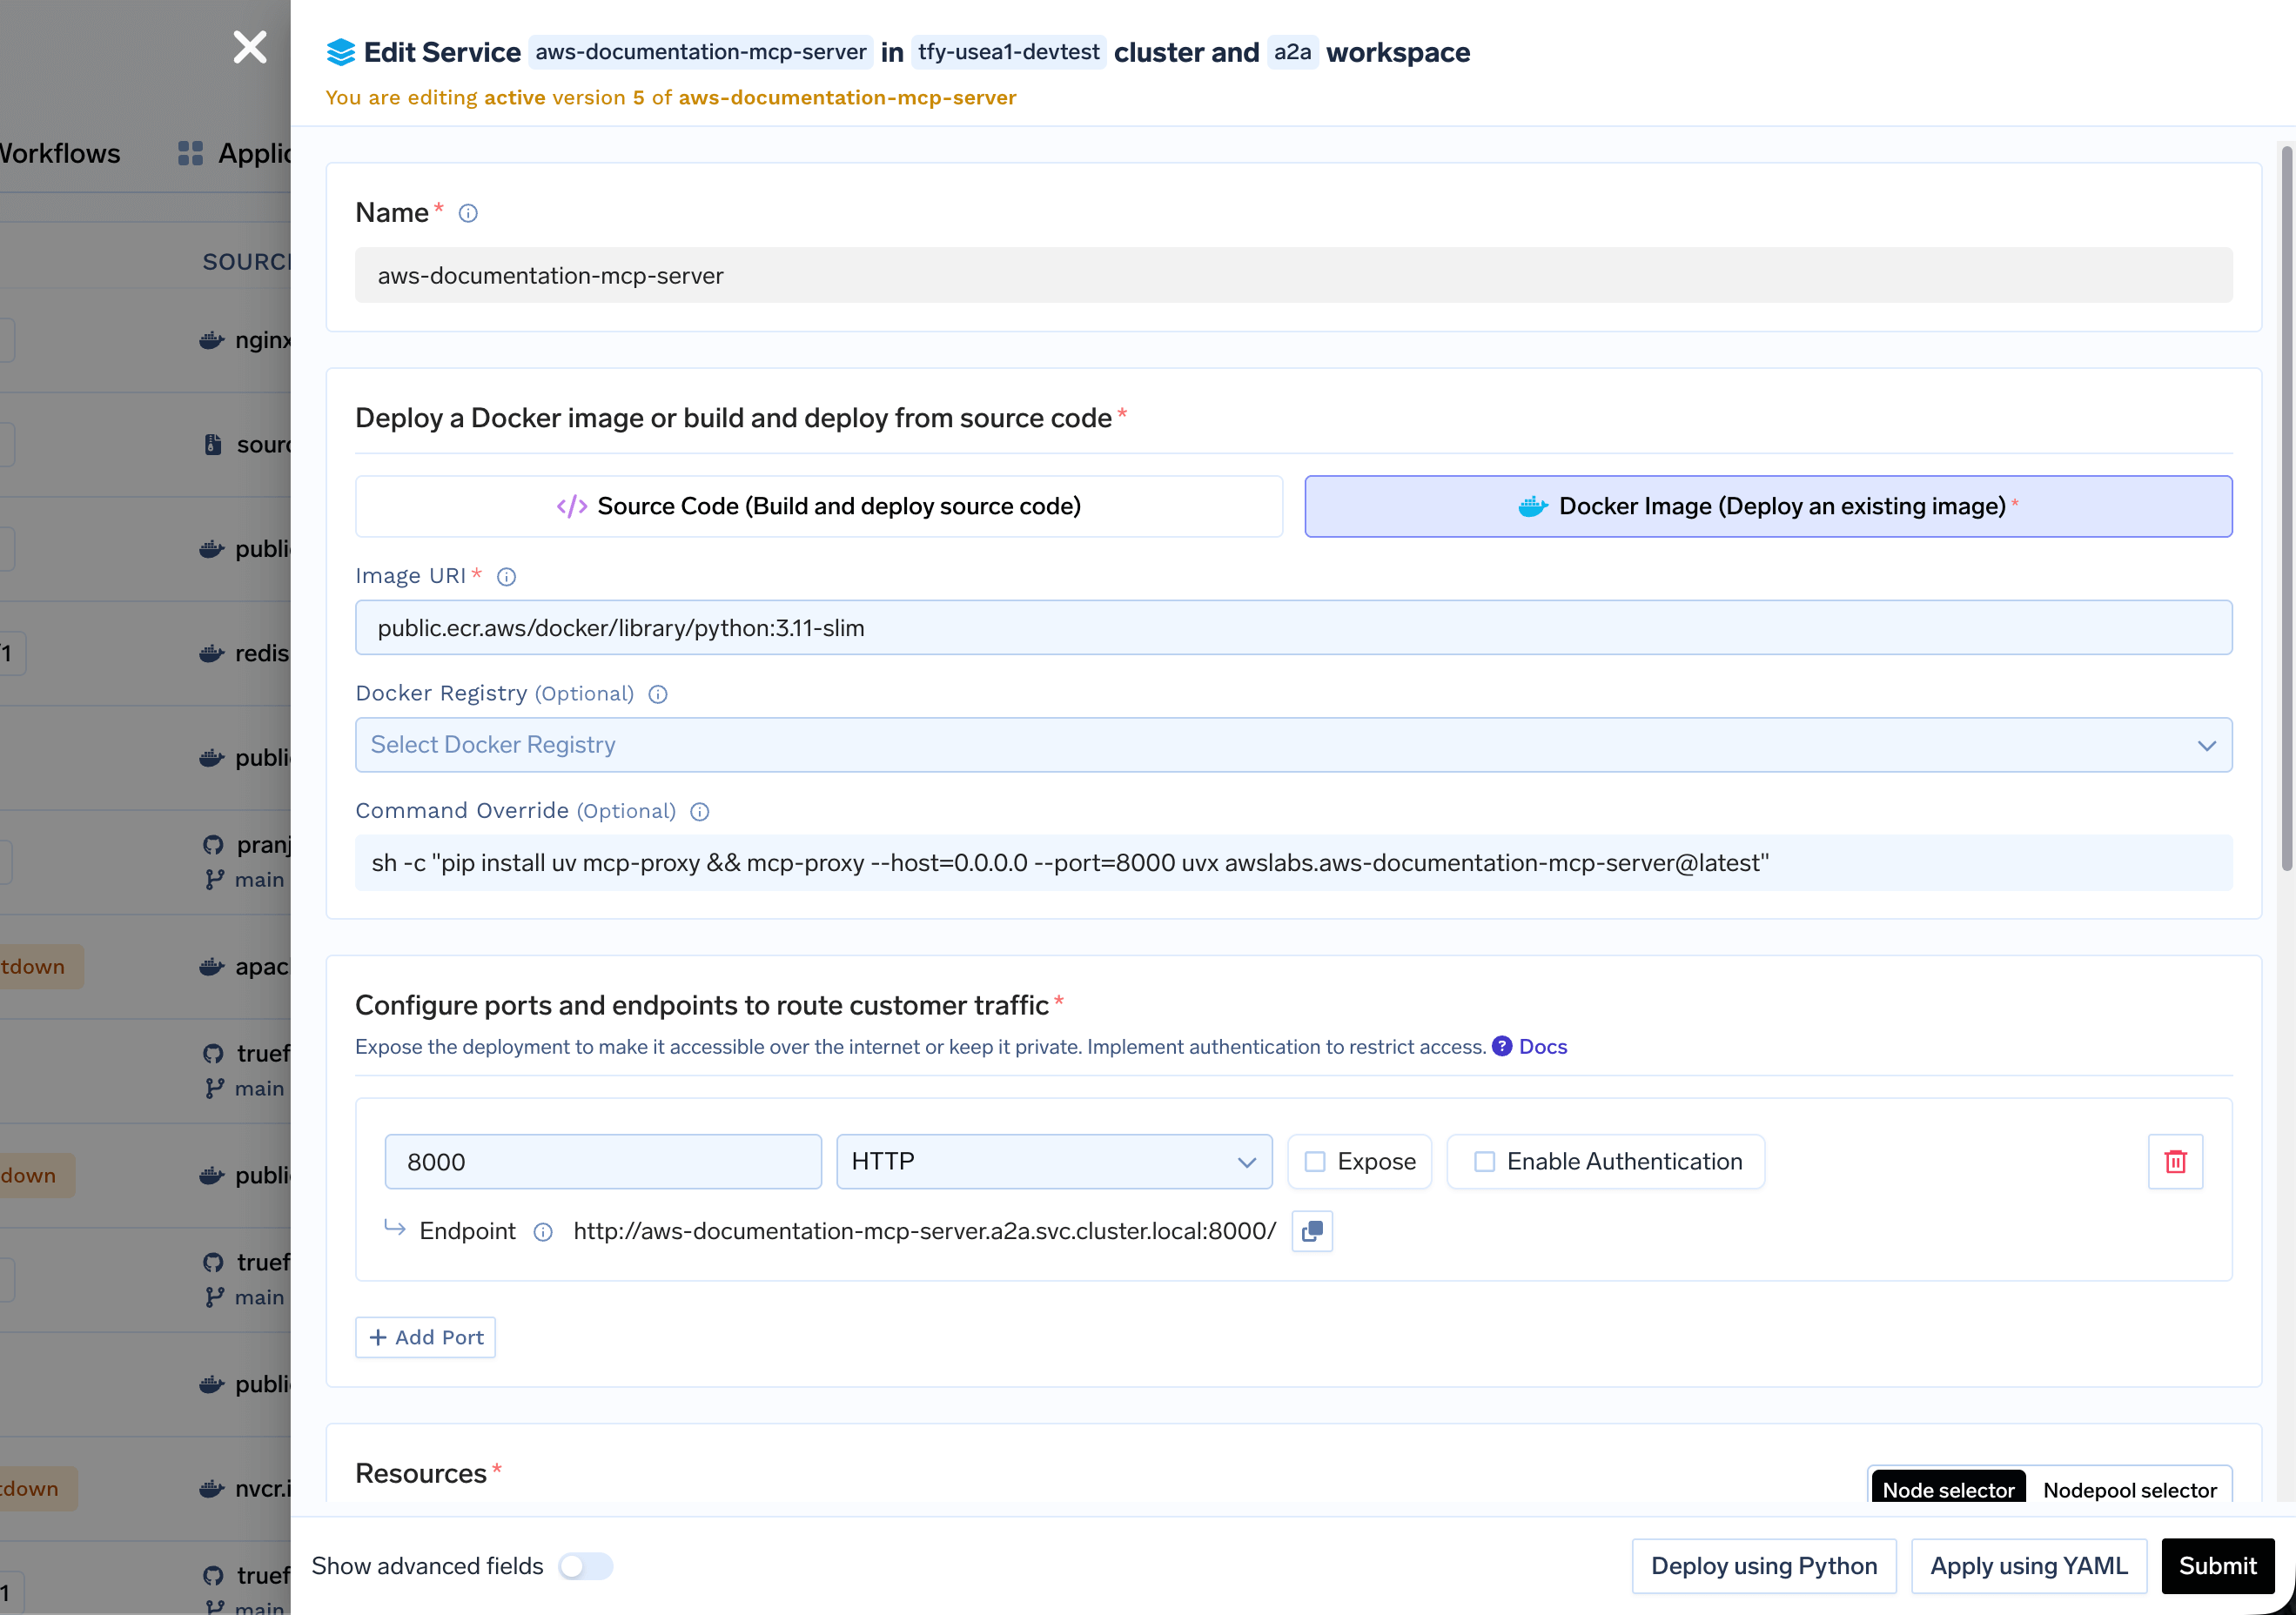
Configure Port
- Click Add Port
- Set Port to
8000 - Set Protocol to
TCP - Set App Protocol to
http - Expose the port on a domain if you want.
Set Environment Variables
Add any required environment variables for your MCP server. These are typically the same variables you would use in your local VSCode/Cursor/Claude configuration:Common environment variables:
NOTION_API_KEY- For Notion MCP serverGITHUB_TOKEN- For GitHub MCP serverPERPLEXITY_API_KEY- For Perplexity MCP serverOPENAI_API_KEY- For OpenAI-related servers
Configure Resources
Set appropriate resource limits. You can start with the default values and later change if needed.
Passing Arguments to Packages
Some MCP servers accept command-line arguments. You can pass them through mcp-proxy: For npm packages (Docker Image): When using Deploy from Docker Image, set the command in the deployment configuration:- Command:
npx -y mcp-proxy --port 8000 --host 0.0.0.0 --server stream npx -y package-name --arg value
- Command:
pip install mcp-proxy uv && mcp-proxy --port 8000 --host 0.0.0.0 --server stream uvx package-name --arg value
Troubleshooting
Package not found
Package not found
- Verify the package name is correct
- Check that the package is published on npm or PyPI
- Ensure
npx -yflag is used to auto-install (for npm packages) - For Python packages, ensure
uvxis installed and working - Review logs for installation errors
Server requires authentication
Server requires authentication
- Check the package documentation for required environment variables
- Ensure all required env vars are set in TrueFoundry
- Use secrets for sensitive values like API keys
- Verify the authentication method matches the package requirements
- Compare with your local VSCode/Cursor/Claude configuration
High memory usage
High memory usage
- npm/Python packages may require more memory during installation
- Increase memory limits if the service fails to start
- Monitor memory usage in the dashboard
Slow startup
Slow startup
- First startup may be slow as npx/uvx downloads the package
- Consider creating a custom image with the package pre-installed
- Use
npm install -g <package>in Dockerfile for faster startups (npm) - Pre-install Python packages in the Dockerfile
Arguments not working
Arguments not working
- Verify the argument format matches the package documentation
- Check that arguments are passed correctly through mcp-proxy
- Review service logs to see how the command is executed
- Test the command locally first to ensure it works